On this page
Last Updated on October 17, 2026 by umar bwn
Most guides treat this as one bullet point — gasket wore out, call a plumber — and stop there. Liberty Pumps’ own install manual treats it as a bounded mechanical fix instead: the cover bolts carry a published torque spec, 40 inch-pounds going in, re-torquable up to 60 specifically to stop a leak found during a pressure test. Check that before you reach for silicone or start pricing a new basin.
Make sure it’s actually the basin first
A sewage ejector basin sits sealed under a bolted, gasketed cover for one reason — it holds raw wastewater between pump cycles, not clean water. If what’s collecting nearby smells like sewage rather than just damp concrete, you’re looking at the right fixture. If it’s clear, odorless water, check whether there’s a separate sump pump basin in the same corner of the basement first — plumbers on JustAnswer field this mix-up constantly, because the two pits often sit a few feet apart and both have round plastic lids. A sewage basin’s cover is bolted down with six to sixteen bolts; a sump lid is usually a looser-fitting snap cover. Different pit, different problem, different fix.
One-minute test: touch a dry paper towel to the wet area and smell it. Sewage odor confirms the ejector basin. No odor at all is worth tracing back to a nearby sump pit, a condensation line, or groundwater before you touch a single bolt on the ejector cover.
The bolts, before anything else
Liberty’s XL-series basins — the type rated for a municipal pressure test — specify sixteen 1/4-20 UNC bolts on the main cover, tightened to 40 inch-pounds. The smaller access/inspection cover bolts to the main cover with its own supplied bolts and washers, at that same 40 inch-pounds — and the manual is specific about the order: tighten the bolts furthest from the power-cord grooves first, working inward. Inside the basin, the pump’s legs drop into integrally molded torque stops, which locate the pump itself and have nothing to do with the cover bolts.
Bolts back off. Vibration from the pump cycling, seasonal temperature swings in an unheated utility space, and simple age all work a bolted joint loose over years, long before the gasket itself gives out. It’s the first thing to rule out because it’s also the only one with a number attached to it.
One-minute test: with the pump unplugged at the wall (never reach toward a basin lid with the pump energized), check whether any bolt turns noticeably before resistance kicks in. A bolt that spins freely for more than a partial turn has backed off from spec.
The instinct that makes it worse
Tightening harder is the obvious reaction to a leak, and it’s the one thing the manual explicitly warns against. The cover gasket is soft and integrally molded to conform to the top of the tank — over-torquing deforms it rather than sealing it better, and can crack the bolt inserts the cover threads into. The manual’s own ceiling is 60 inch-pounds, used specifically to chase a leak found on a pressure test, not as an invitation to keep cranking past it. If 60 doesn’t stop it, the fix isn’t a tighter bolt — see the pipe seal and the basin sections below.
Sealant does have a sanctioned place here, but it is an assembly step, not a leak cure. Liberty’s instructions say sealant such as silicone “can be applied on both sides of the rubber gasket surface to ensure proper sealing” — meaning when the cover goes on, before the bolts are torqued. That is the opposite of smearing silicone around the outside of a seam that is already weeping, which never reaches the gasket face where the seal is actually made. If the cover is already bolted down and leaking, torque is the documented fix; sealant only comes back into it once the cover is off.
A pipe penetration, not the main seam
Home inspectors on NACHI’s forum flag a second, separate failure point: the rubber or latex sealant around the individual pipes — the discharge line, the vent, sometimes a second inlet — passing through the cover, rather than the gasket under the bolted rim itself. One documented case described that sealant “broken, all dried up and has fallen off” while the main cover gasket was intact. It’s a smaller, slower leak than a loose bolt circle, and it’s easy to miss because attention naturally goes to the bolts first.
One-minute test: with the pump unplugged, run a flashlight beam low and sideways across each pipe penetration on the cover, looking for a gap, a shrunken bead, or a crumbling ring of old sealant rather than a continuous seal. A loose bolt circle tends to weep evenly around the whole rim; a failed penetration seal shows wetness tracking from one specific pipe.
Two different seals are doing two different jobs
It’s worth knowing this before you go further, because it changes what a “leak” even means here. A sealed ejector basin carries two independent sealing systems, not one:
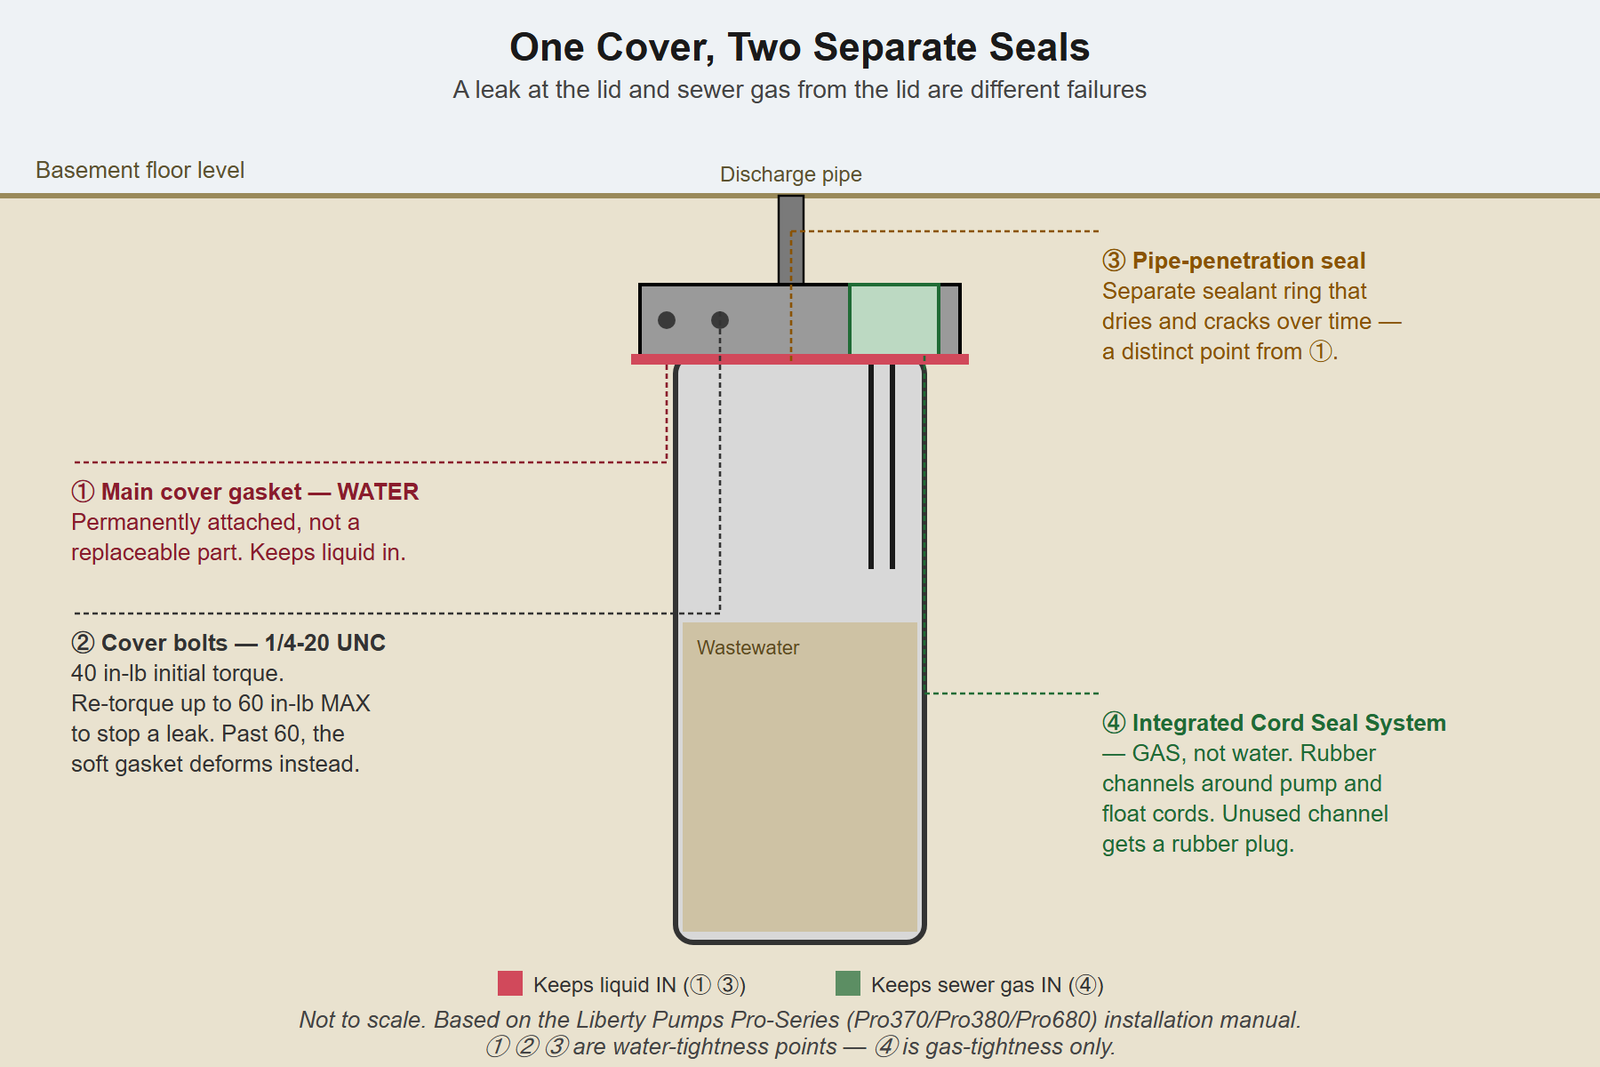
- The main cover gasket — permanently attached to the cover, not sold as
a replaceable part — keeps liquid inside the basin.
- The Integrated Cord Seal System — separate rubber channels under the
access cover that the pump and float cords pass through, with any unused channel closed off by its own rubber plug — exists for a different purpose entirely: keeping sewer gas from leaking out.
Water pooling at the rim and a sewer smell from the same cover are two different failures with two different causes, even though they share one lid. If what you actually have is odor with no visible moisture, you’re not reading this article — see why a sewage ejector pit smells and how to seal it instead, which covers the cord-seal side of this same cover.
It’s also worth knowing what this symptom is not. Liberty’s own pump-manual troubleshooting table — the same five-row fault list this site has already pulled apart for a pump that runs but the pit doesn’t empty and for a noisy ejector pump — has zero rows for an external leak. Every cause on that table is a pump, valve, or discharge-line fault happening inside the sealed basin. A leak at the lid sits entirely outside the manufacturer’s own fault-finding model, which is exactly why the ranking SERP results treat it as a one-line afterthought instead of a diagnosis — there’s no manufacturer troubleshooting page to copy from. You have to work it out from the install manual instead, which is what the sections above do.
If the basin itself has failed
This is the least common cause and the one that actually ends in a replacement. A warped cover that no longer seats flat, a cracked basin wall, or a split at a molded fitting won’t respond to bolt torque at all — the leak keeps weeping at the same rate no matter how the cover is re-seated, and it’s more often a steady trickle or an actual puddle than the slow seep a bolt or pipe-seal failure produces. Age and ground movement are the usual causes on an older basin; a basin that’s cracked from a hard impact during a prior repair is the other.
If a re-torqued cover and a checked pipe seal haven’t stopped it, the basin has failed structurally, and that’s a different job than a seal kit — the whole unit gets replaced, not patched. Our guide to the best sewage ejector pumps covers verified basin and pump specs if you’re at that point, including which basins are rated for the pressure test mentioned below.
Why some municipalities test this seam specifically
Liberty’s XL-series basins are built to withstand what the manual calls the “10-foot stack test” — a required pressure/leak test in some jurisdictions, applied to the sealed basin itself. It’s a water-tightness test, and it’s a separate requirement from the gas-tightness venting rules covered in does an ejector pit need its own vent. A basin can pass one and fail the other — holding water under pressure while still needing a proper vent connection, or vice versa — because they’re testing two different things about the same lid. If your jurisdiction requires the stack test as a condition of approval and the cover is weeping at the current torque, re-torquing to the documented 60 inch-pound ceiling is the step the test itself anticipates, not a workaround.
When this needs a pro
Checking and re-torquing the cover bolts, and inspecting the pipe-penetration seals, is reasonable homeowner territory with the power disconnected first. Past that point, it isn’t. This basin holds raw sewage under a gas-tight seal, and anything beyond re-seating the existing cover — disassembling the cover plate, replacing a cracked basin, or reworking the discharge union — means breaking that seal on a system carrying mains voltage at the pump itself. Liberty’s warranty says plainly that it does not cover a product that “has been disassembled, modified, abused, or tampered with” — the manufacturer’s own line for where this stops being a DIY repair. A cracked basin, in particular, is a licensed-plumber job, not a sealant job — the replacement basin has to be re-plumbed and re-vented to code, not just swapped in.
FAQ
Is a leaking ejector basin the same problem as a leaking sump pump?
No, and it’s worth confirming which one you actually have before doing anything. A sewage ejector basin holds wastewater under a bolted, gasketed cover with six to sixteen bolts; a sump pump basin usually has a looser snap-fit lid and holds clear groundwater. Smell is the fastest tell — sewage odor means the ejector basin, no odor points toward the sump pit or another source nearby.
Can I just keep tightening the cover bolts until the leak stops?
Only up to a point, and the manufacturer publishes that point: 40 inch-pounds going in, re-torquable to 60 to chase a leak found on a pressure test. Past 60, you’re not sealing the gasket better — you’re deforming the soft integral gasket or cracking the bolt inserts it threads into, which makes the leak worse and turns a bolt problem into a cover problem.
Does water leaking from the lid mean sewer gas is also getting out?
Not necessarily. The main cover gasket (water) and the Integrated Cord Seal System (sewer gas) are two separate seals doing two separate jobs on the same cover. A basin can weep water at the bolt seam with its gas seal completely intact, or smell of sewer gas with a bone-dry cover, depending on which system has actually failed.
Do I need to replace the whole basin if re-torquing the bolts doesn’t work?
Not automatically. Check the pipe-penetration sealant next — it’s a smaller, separately documented failure point that doesn’t show up as loose bolts. A full basin replacement is the last step, reserved for a warped cover or a cracked basin wall that keeps weeping at the same rate no matter how the cover is reseated.