On this page
Last Updated on November 5, 2026 by Muhammad Toqeer
The switch is the easy part. The part that decides whether you do this once or twice is the nipple behind it.
A well pressure switch is a twenty-minute job and a small part. That is exactly why it gets replaced so often when it was never broken — it is the cheapest thing in the pressure assembly, so it absorbs the blame for faults that belong to the plumbing it is screwed into.
The switch does not sense water. It senses pressure arriving through a 1/4-inch threaded nipple. If that passage is restricted by scale, iron or sediment, the switch reads a pressure that is late, damped or simply wrong — and it will do that just as faithfully when it is brand new.
So this page covers the replacement, and it covers the check that stops you from doing the replacement a second time.
What has to happen before you touch anything?
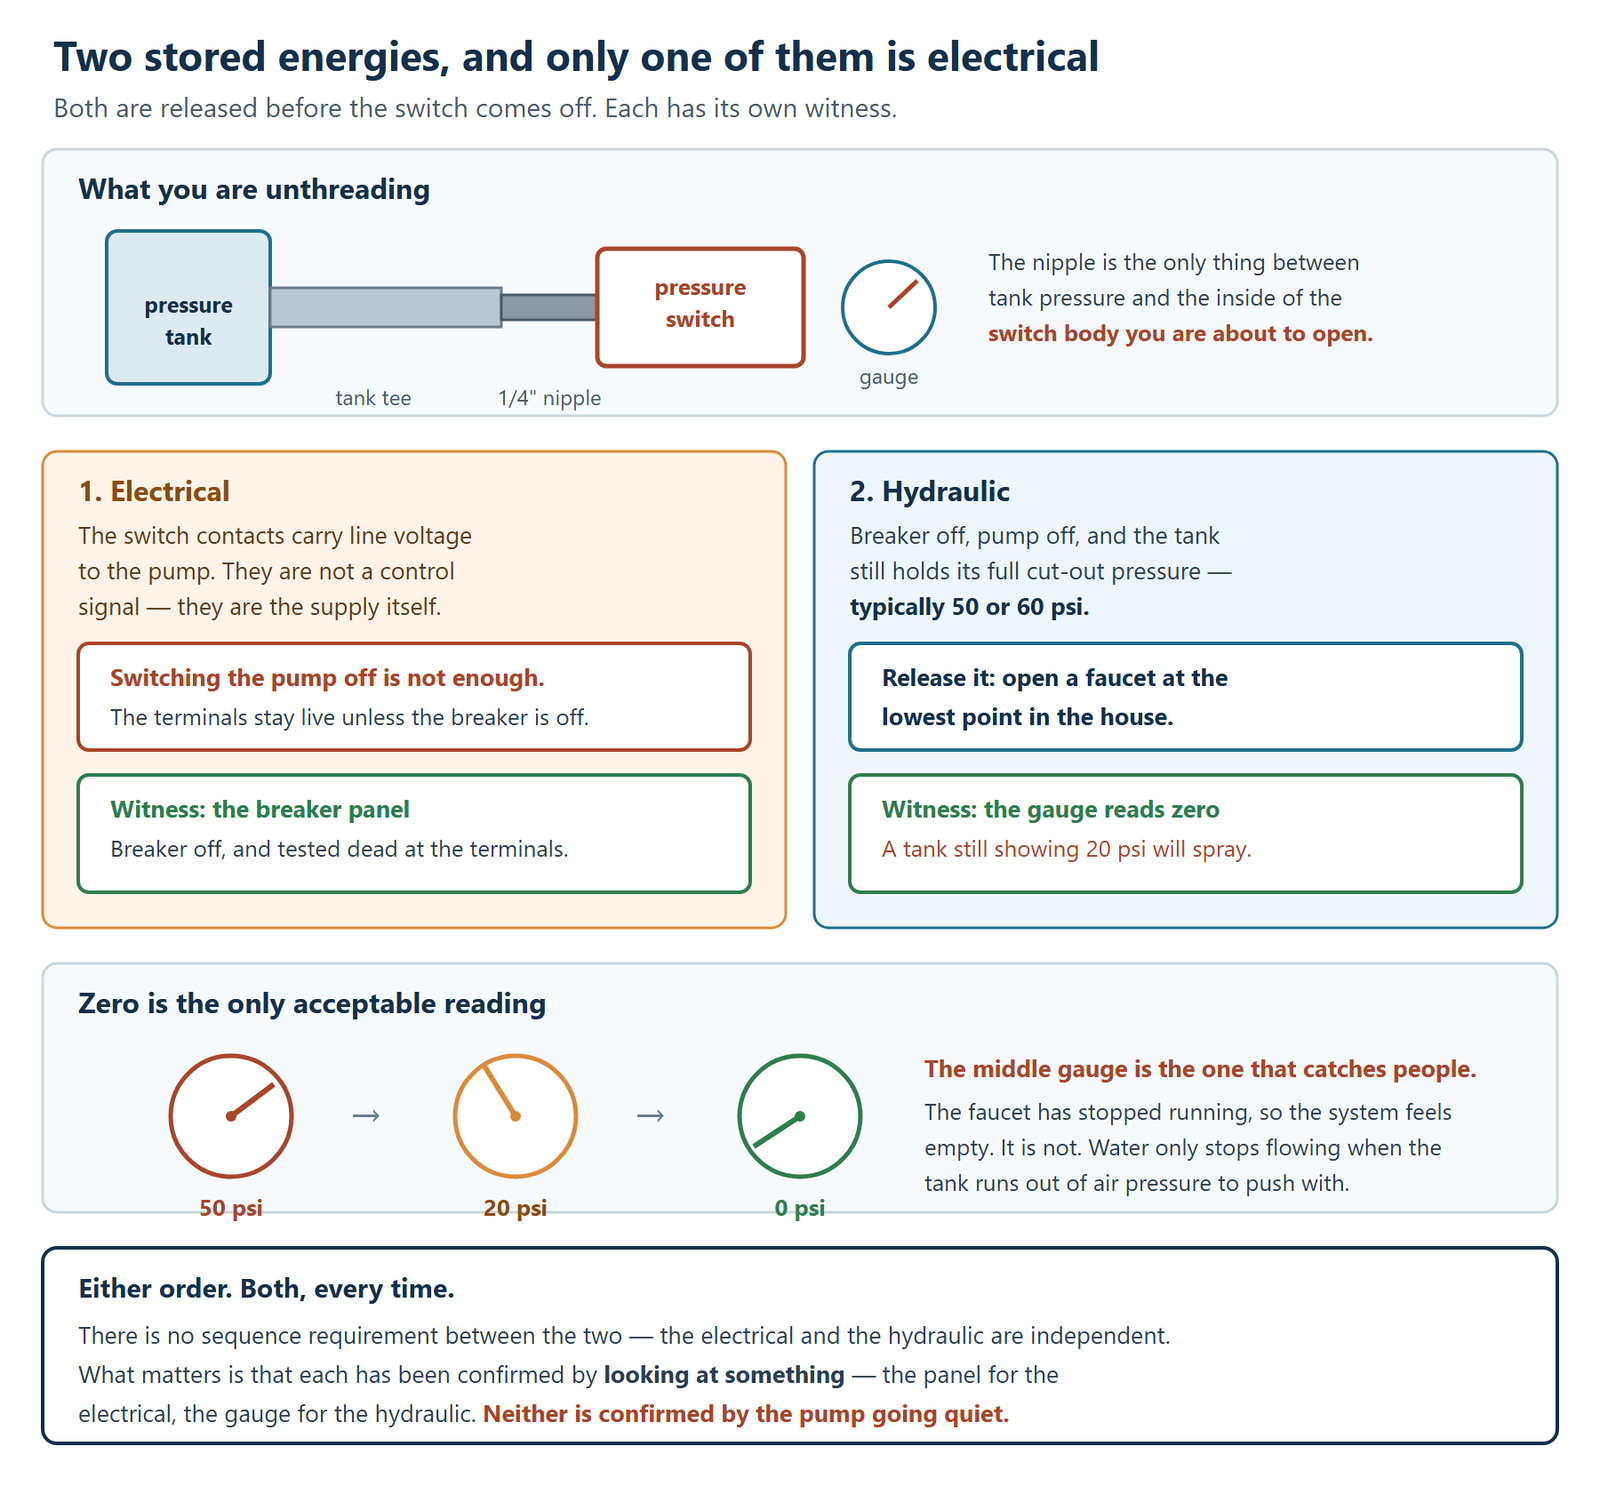
Two separate stores of energy sit inside this assembly, and they are released in completely different ways.
Electrical. The switch contacts are what carry line voltage to the pump or to the control box. Turning the pump off somewhere downstream does nothing to the terminals you are about to unscrew. Switch the breaker off at the panel, then confirm with a meter at the switch terminals.
Hydraulic. With the breaker off and the pump dead, the pressure tank is still holding its full cut-out pressure. That pressure is inside the nipple and inside the switch body. Open a faucet at the lowest point in the house and leave it open until the gauge reads zero. Not low. Zero.
A tank still holding 20 psi will push water past the threads the moment they let go.
How do you get the old switch off?
With both energy sources released:
- Photograph the wiring before you loosen a single screw. Two line conductors in, two load conductors out, and a ground. The pairs are not interchangeable, and the terminals are rarely labelled in a way you will remember in ten minutes.
- Loosen the conduit nut or cord grip and free the cable so the switch body can turn.
- Unthread the switch from the nipple, not the nipple from the tee. The switch is the sacrificial part here. If the nipple turns with it, that is useful information — see the next section.
- Look into the switch’s threaded port as it comes off. That is your first diagnostic reading.
Why should you replace the nipple at the same time?
This is the part most instructions leave out, and it is the reason a replaced switch sometimes behaves exactly like the old one.
The nipple is a short brass or galvanised fitting with a bore of roughly an eighth of an inch after the threads. In water carrying iron or hardness, that bore closes gradually from the inside. A partly blocked nipple does not stop the switch working. It makes the switch slow.
What that looks like in use:
- The pump runs past its cut-out setting before the switch reacts
- The pump keeps running briefly after a faucet closes
- Cut-in and cut-out both read higher at the gauge than the switch is set for
- On a badly restricted nipple, short cycling, because pressure in the switch body no longer tracks pressure in the tank
Every one of those reads as a switch fault. None of them is. If the pump is short cycling, its own causes are worth ruling out first before you decide the switch assembly is at fault at all.
The nipple costs less than the switch. Replace it on principle whenever the switch comes off, and if the old one is restricted, you have found the actual fault rather than postponed it.
How do you fit the new switch?
- Thread the new nipple into the tee with PTFE tape or pipe dope — two to three wraps, in the direction that tightens — and keep sealant out of the bore.
- Thread the switch onto the nipple hand-tight, then bring it round with a wrench until the cover faces where you can open it. Do not use the switch body as the lever against a tight nipple.
- Reconnect using your photograph. Line to the line terminals, load to the load terminals, ground to the green screw.
- Close up the cord grip so the cable cannot pull on the terminals.
A new switch arrives preset — commonly 30/50 or 40/60 — and that preset is usually what you want. Do not adjust it on the bench. The two adjustment nuts do different things, and adjusting them has its own sequence that only makes sense with the system running.
How do you know it worked?
Close the faucet. Turn the breaker on. Then watch the gauge, not the pump.
| What you should see | What it tells you |
|---|---|
| Pump starts immediately | Tank is empty, contacts are closed, wiring is right |
| Gauge climbs steadily to cut-out | Nipple is clear and the switch is tracking the tank |
| Pump stops at the printed cut-out, within a few psi | The switch is doing what it says on the label |
| Open a tap: pressure falls to cut-in, pump restarts | The full cycle works |
The second row is the one you are really testing. A clear nipple makes the gauge and the switch agree. A restricted one makes the pump overshoot, and that is the fault you came here to stop repeating.
If the pump never starts at all, that is a different problem with a different list — a switch that will not cut in is usually about contacts or the cut-in setting, not the fitting. If it starts and never stops, a switch that will not cut off points at the tank or the well before it points at the switch.
When does this need a pro?
- The nipple will not come out of the tee, or it shears. You are now into the tank tee, which means draining and rebuilding the assembly.
- The tee, tank fitting or gauge port is weeping. Replacing a switch on corroded brass can turn a twenty-minute job into a flooded utility room.
- The new switch trips the breaker. That is a fault downstream of the switch — in the cable, control box or motor — and the switch merely closed the circuit onto it.
- There is no breaker you can positively identify as feeding the pump circuit.
- The well is a deep set with a control box. The switch still controls it, but the box carries capacitors that hold charge after the power is off.
FAQ
Do I need to drain the pressure tank to replace the switch?
You do not need to drain it, but you do need to bring it to zero pressure. Open the lowest faucet in the house with the breaker off and leave it open until the gauge reads zero. A tank with air still charged above the bladder will hold pressure longer than you expect, so trust the gauge rather than the sound of the faucet.
Can I replace a well pressure switch myself?
The mechanical part is straightforward. The electrical part puts your hands on line-voltage terminals, so it depends on whether you can positively identify and lock off the breaker feeding that circuit and confirm the terminals are dead with a meter. If either of those is a guess, it is not a do-it-yourself job.
Why does my new pressure switch act like the old one?
Most often because the fault was never in the switch. A partly blocked 1/4-inch nipple between the tee and the switch delays the pressure signal, so the pump overshoots its cut-out and may short cycle — with a new switch exactly as with the old. Replace the nipple whenever the switch comes off.
Does it matter which wires go where on a pressure switch?
Yes. One pair of terminals is line, the other is load, and swapping them leaves the pump permanently energised or permanently dead depending on the wiring. The two sides are not symmetrical even though they look it, so photograph the connections before loosening anything.
What pressure switch setting should I use when replacing one?
Match what the system had, which is almost always printed on the old switch. Most domestic wells run 30/50 or 40/60. Fitting a higher range than the pressure tank and plumbing were set up for raises pressure everywhere, and the difference between the two ranges has consequences worth understanding before you change it.
How long does a well pressure switch last?
There is no useful age figure, because the wear is in contact cycles rather than years. A switch on a system that short cycles can burn its contacts in a season, while one on a correctly sized tank can run a decade. If a switch has failed early, the cycle count is the thing to investigate, not the brand.