On this page
Last Updated on October 13, 2026 by umar bwn
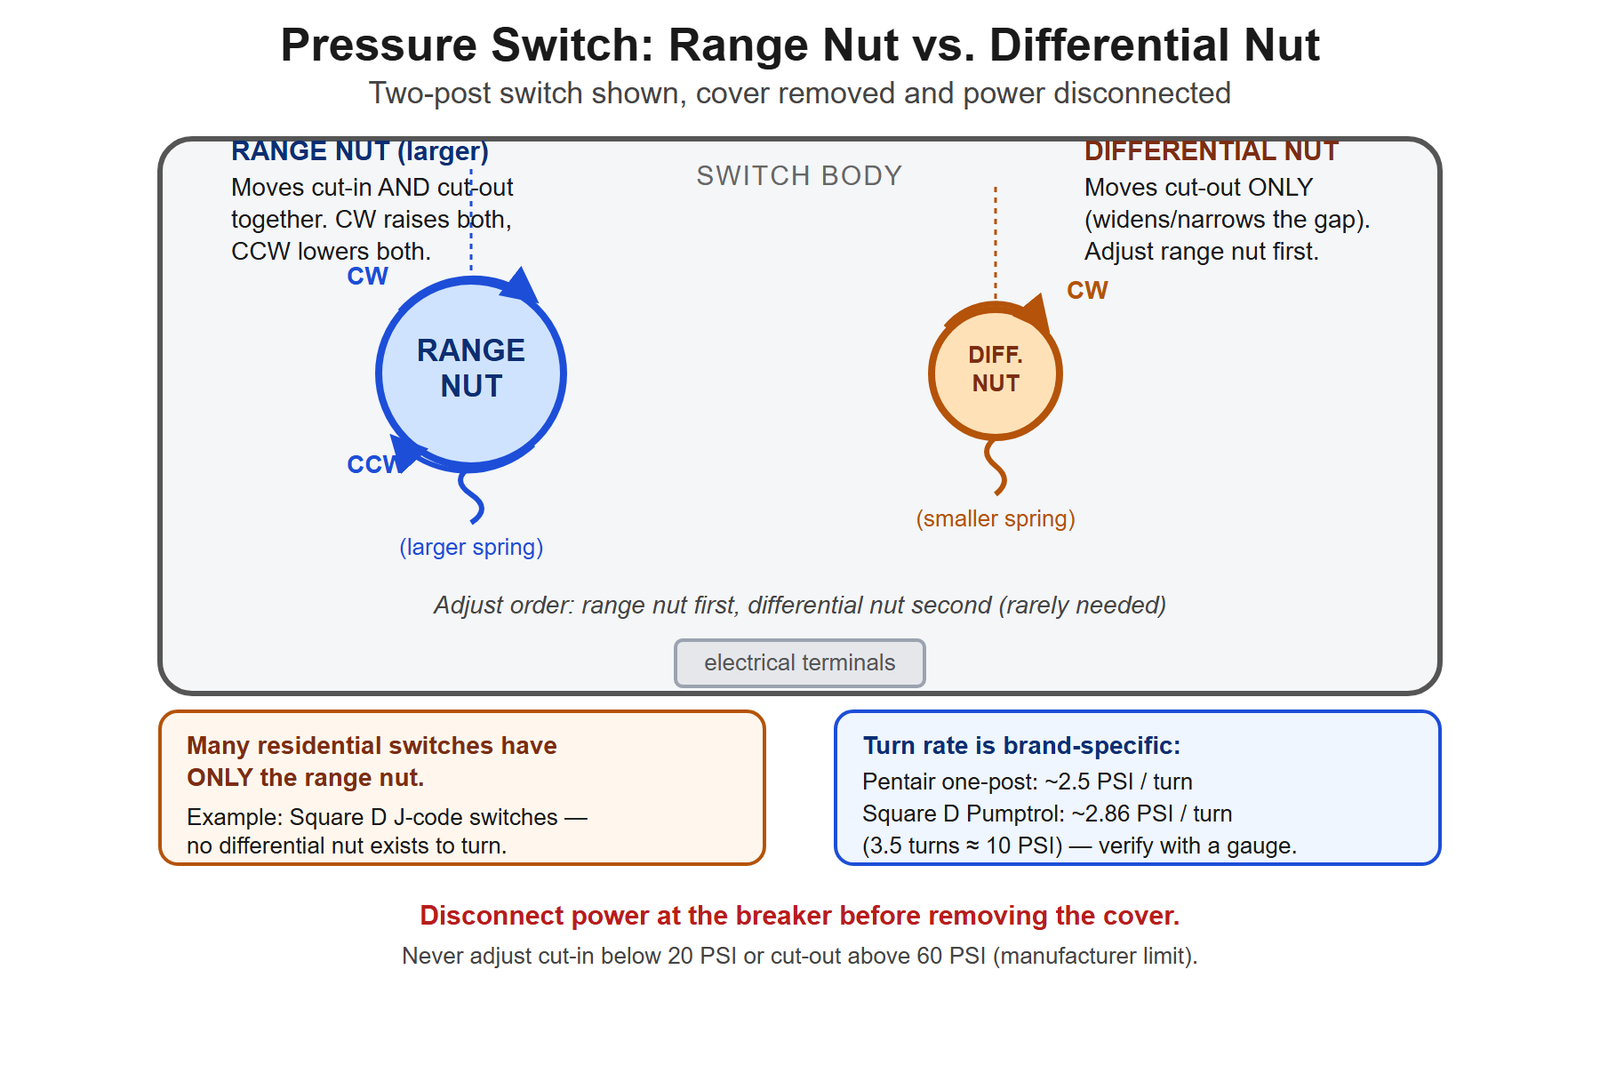
Loosen the switch cover and you’ll find one nut or two. The larger range nut raises both cut-in and cut-out together when turned clockwise, lowers them counterclockwise. A smaller differential nut, where one exists, moves only the cut-out point. Adjust the range nut first, confirm with a gauge, and don’t push cut-in below 20 PSI or cut-out above 60.
That’s the whole job in outline. The rest of this is the part that keeps people from getting hurt or from turning the wrong nut the wrong amount — because the two mistakes that actually happen here are turning the nut past what the switch is rated for, and testing the new cut-out setting against a closed valve.
What you need
- A nut driver or small wrench sized to your switch’s adjustment nuts — check the nut itself before you start; sizes vary by brand
- A pressure gauge you trust — not the switch’s stamped scale, which is approximate at best
- A voltage tester or multimeter, to confirm the circuit is actually dead before the cover comes off
- A flashlight. Switches live in dim utility rooms and well pits.
Kill the power before the cover comes off
This is not a formality. Pentair’s own instruction sheet for these switches states it in capital letters: hazardous voltage, disconnect power before working on the motor or the pressure switch. A well pump switch is typically wired on a 240V circuit with its own double-pole breaker, and the switch body has exposed electrical terminals right next to the adjustment nuts you’re about to turn.
This is where it stops being a DIY job if you’re not sure. If you can’t positively identify which breaker feeds the pump, or you don’t have a meter to confirm the circuit is dead before you touch anything inside the cover, stop and call an electrician or your well contractor. Guessing at a 240V breaker in a panel you don’t fully understand is exactly the situation licensed trades exist for.
Flip the breaker, pull the cover’s retaining screw, and set the cover aside somewhere it won’t collect dust while you work.
Step 1: See what kind of switch you actually have
Residential well systems run two different switch designs, and they’re not adjusted the same way.
One-minute test: look at what’s under the cover. One spring-loaded nut, or two?
- One nut (one-post switch). Turning it moves cut-in and cut-out together, and the gap between them is fixed by the switch’s design — it’s why the standard factory settings (20/40, 30/50, 40/60) all show the same 20 PSI gap. This is the common case on residential Square D J-code switches: there’s no second nut hiding anywhere, because none exists to find.
- Two nuts (two-post switch). A larger range nut does the same job as above, plus a smaller differential nut that moves the cut-out point by itself, narrowing or widening the gap.
If you’re not sure which you’re looking at, that uncertainty itself is informative: a switch with genuinely nothing else to turn is a one-post switch, full stop.
Step 2: Adjust the range nut
Turn clockwise to raise both cut-in and cut-out, counterclockwise to lower both. Make small moves — a quarter to half turn — and test before turning further.
How much pressure per turn depends on the switch, not on a rule of thumb. This is the detail almost every guide skips past, and it matters because the same turn count means something different on a different switch:
- On Pentair one-post switches, each full turn moves the setting roughly 2½ PSI — four full clockwise turns adds about 10 PSI.
- On Square D Pumptrol switches, the figure is closer to 2.86 PSI per turn — about 3½ turns for the same 10 PSI change.
Those numbers aren’t interchangeable. Count turns as a rough guide, then confirm the actual result against your gauge every time, not just at the end.
Never adjust cut-in below 20 PSI or cut-out above 60 PSI. This isn’t a suggestion — it’s the hard floor and ceiling printed on the manufacturer’s own adjustment instructions, and it exists because most residential tanks, fittings and fixtures aren’t rated to run reliably outside that band.
If you’re raising the cut-in, this is also the moment to flag something for later rather than deal with it now: the tank’s air pre-charge has to move with the new cut-in number, or the tank will waterlog early. Setting the correct air charge is a five-minute job with the tank fully drained of water — do it right after you finish here, not next week.
Step 3: The differential nut, if you have one
Leave it alone unless you have a specific reason to touch it. Square D’s own instructions for the Pumptrol line are blunt about this: very few applications ever need the second nut adjusted. It controls the width of the gap between cut-in and cut-out, not where the gap sits — and a gap that’s too narrow makes the pump short-cycle, which is its own problem with its own fix.
If you do need to adjust it, make this change second, only after the range nut is set where you want it — and turn it in small increments, watching only the cut-out number on your gauge, since this nut by design leaves cut-in untouched. Which direction widens versus narrows the gap isn’t consistent enough across brands to state as a blanket rule here; confirm it on your specific switch with one small test turn before committing to a full adjustment. Adjusting both nuts at once is how people lose track of which number moved because of which nut.
Step 4: Test it — carefully
Watch the gauge through a full cycle: pump kicks on at cut-in, runs up to cut-out, shuts off. Do this with a faucet open somewhere in the house so the system is actually flowing, not sitting static.
One real hazard here that gets skipped in most write-ups: don’t test cut-out pressure against a closed valve for longer than it takes to read the gauge. A pump running against a fully closed discharge builds pressure with nowhere for it to go, and the manufacturer’s own literature calls this out as an explosion risk, not just a “don’t do it” footnote. Cut-out should sit at least 5 PSI below whatever the pump can produce dead-headed — if you don’t know that number, don’t go hunting for it by closing a valve and watching the needle climb.
When turning the nut changes nothing
Sometimes the range nut moves, the spring visibly compresses, and the cut-in and cut-out pressures don’t budge. That’s not you doing it wrong — on a Terry Love Plumbing Forum thread from a homeowner whose tank was cycling off at 40 PSI but back on at 10 (against a switch that should have held closer to 30/50), the cause turned out to be mineral scale lodged under the switch’s internal diaphragm, physically preventing it from responding to the adjustment at all. The fix in that case wasn’t a different turn count — it was a new switch.
If you’ve made a clean quarter-turn adjustment, confirmed it against a gauge, and the actual cut-in or cut-out hasn’t moved at all, stop turning. You’re not failing to find the right amount; the switch has stopped responding to the nut, and no amount of further turning fixes that. A switch stuck at the wrong pressure no matter how it’s adjusted behaves differently from one that simply won’t cut off at all electrically — if yours never shuts the pump off once it reaches pressure, that’s a different fault with its own diagnosis in why a pressure switch won’t cut off.
When the pump won’t reach the new number
There’s a second way this goes wrong that isn’t the switch’s fault at all. If you raise cut-out above what the pump is actually capable of producing, the pump doesn’t error out or trip a breaker — it just runs continuously, straining toward a pressure it can’t reach, which is a real path to thermal overload rather than a harmless “almost there.”
The useful diagnostic question is whether the pump used to reach that pressure and no longer does. If it held 50 PSI cut-out fine for years and now can’t, with the switch itself testing correctly, the pump has lost capacity — worn impeller stages, a motor that’s lost efficiency, or a unit that was undersized for the well’s actual depth from the start. That’s not a number you fix with a different nut setting. If you’re at that point, it’s worth comparing what you have against current deep well submersible pumps rated for your depth and flow before you spend more time chasing a setting the hardware genuinely can’t hit.
After you’re done
Two things worth doing before you walk away, neither of which is optional if you changed the cut-in number:
- Recheck the tank’s air pre-charge. It has to sit below the new cut-in — see the linked air-charge guide above for the exact procedure.
- Watch one full cycle with a faucet running, not just the gauge sitting static. A switch that looks right on paper can still short-cycle if the differential ended up too narrow, which shows up as rapid on-off cycling covered in well pump short cycling.
If what actually brought you here was a pump that won’t start or stop at all rather than wrong numbers, you may be looking for how to reset a well pump instead — resetting addresses a tripped or stuck control, not a pressure setting, and they’re solved differently even though they’re often confused for the same problem.