On this page
- Find exactly where the sump pump lid is leaking water
- The rim and the penetrations are two different seals
- Why does the rim seal fail if nothing's visibly broken?
- If it's only wet at the pipe or cord, the rim is fine
- A sump lid was never sold as watertight to begin with
- When a new lid is the actual fix
- When this stops being a lid problem
- The cover was never the weak point — the expectation was
Last Updated on October 17, 2026 by umar bwn
A sump pump lid leaking water usually means one of two separate seals has failed, not one. A flat cover seals its outer rim with a gasket, and seals the discharge pipe and pump cord passing through it with a separate grommet — different failure, different fix. Find out which one is actually wet before you reach for silicone or price a new lid.
Find exactly where the sump pump lid is leaking water
Wipe the entire top of the lid bone dry with a towel, including the rim seam and the area right around the pipe and cord. Then run the pump through one full cycle — pour a few gallons into the pit if it isn’t already cycling on its own — and watch the lid, not the floor, for the first thirty seconds after it kicks on.
One-minute test: water that reappears as a line or beads tracking around the outer edge of the lid, where it meets the concrete, means the rim seal. Water that shows up only at the spot where the pipe or cord passes through the cover, with the rest of the rim staying dry, means the grommet. They almost never fail at the same time, so this one look usually settles it before you touch a tool.
The rim and the penetrations are two different seals
This is worth knowing before you go further, because it decides which half of the lid you’re even looking at. Patent filings for sump and crock covers (the construction is still sold today) describe two independent sealing systems on the same piece of plastic: a continuous gasket — or, on some designs, a pair of O-rings seated in grooves — running the full perimeter where the lid meets the concrete rim, and a completely separate grommet dedicated to whatever actually passes through the cover: the discharge pipe, the pump cord, sometimes a float cord or a backup-pump cord sharing the same hole.
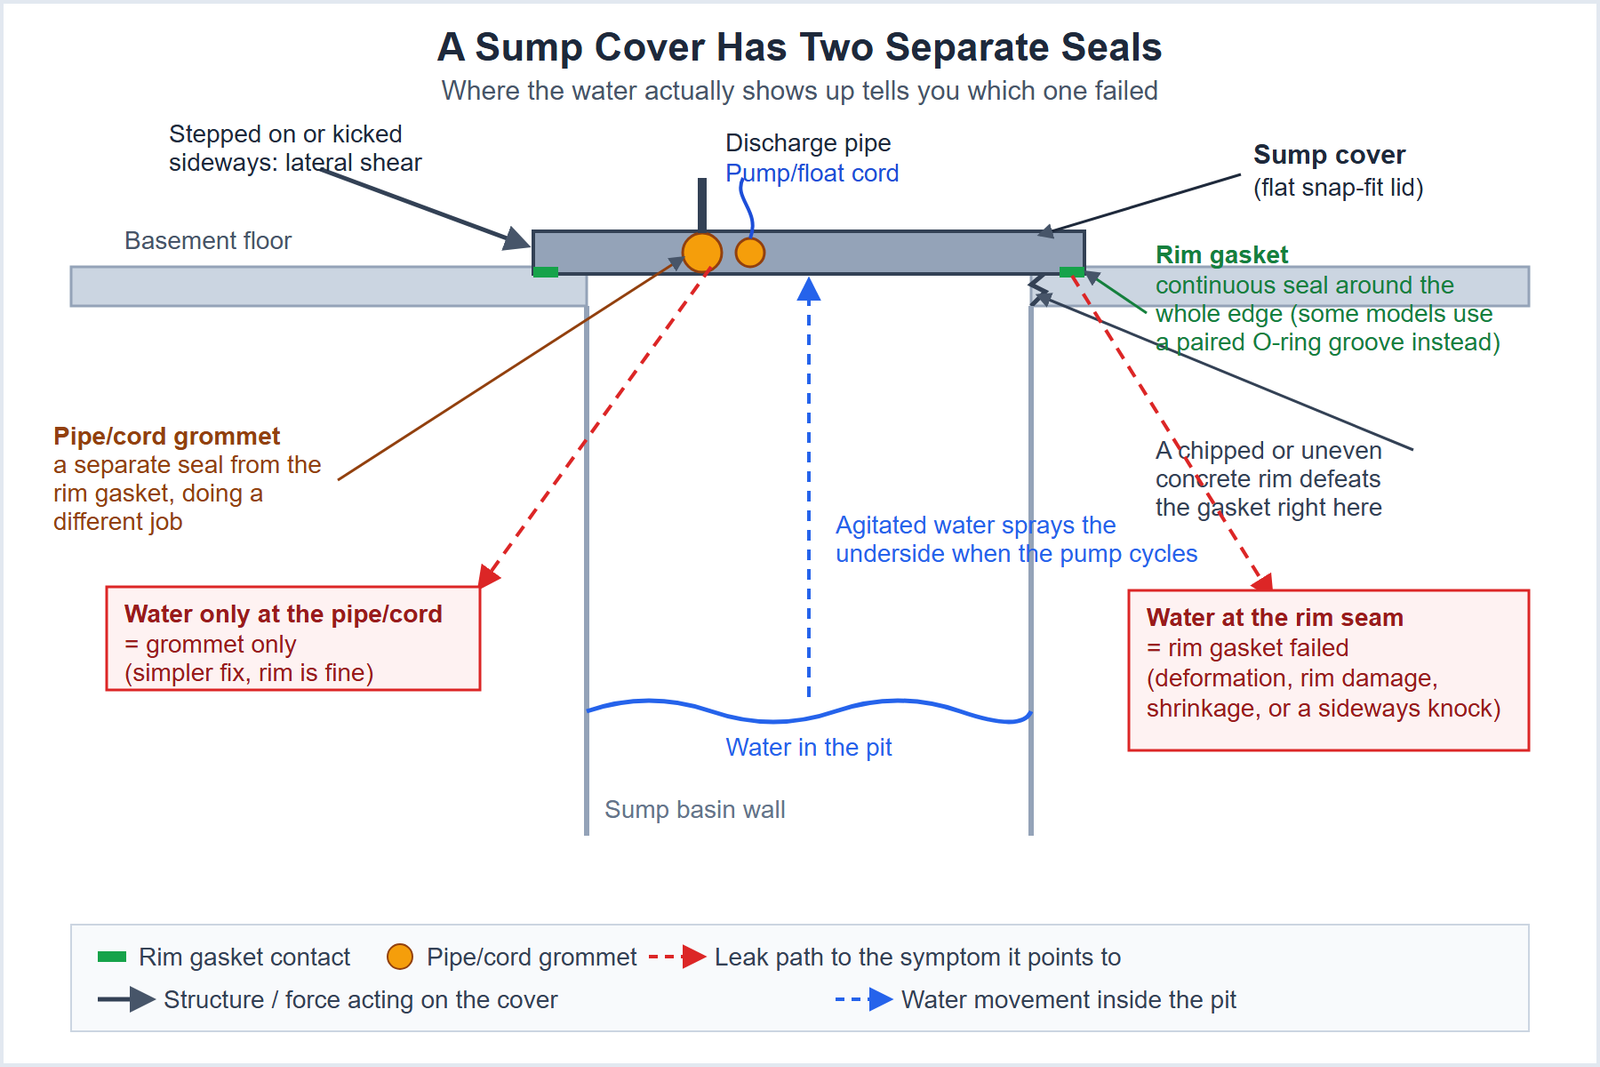
That split matters diagnostically: dryness at the grommet while the rim weeps, or the reverse, isn’t a contradiction. It’s the lid telling you exactly which hardware to replace instead of the whole cover.
Why does the rim seal fail if nothing’s visibly broken?
Four specific things defeat a rim gasket, named directly in the patent literature for this hardware. “The seal wore out” isn’t really one of them — each of these is a distinct, checkable cause. No manufacturer troubleshooting table ranks these by how often each one actually turns out to be it, so what follows is ordered by how easily you can rule each one out, not by likelihood.
The lid itself has warped
Plastic covers left in a damp, temperature-swinging crawlspace or utility room corner can bow slightly over years, enough that the gasket no longer sits flat against the rim everywhere around the circle.
One-minute test: with the pump unplugged and the lid off, set it face-down on a flat floor and sight along its edge at eye level. A warped lid rocks or shows daylight under one side instead of sitting flush.
The concrete rim itself is chipped or uneven
The gasket can be perfect and still fail if what it’s pressing against isn’t flat. A chip from a prior service call, a rough pour, or settling over the years creates a gap the gasket can’t bridge.
One-minute test: lid off, pump unplugged, run a finger slowly around the full circle of exposed concrete the gasket seats on, feeling for a nick, a high spot, or a soft low spot rather than a continuous smooth edge.
The gasket material has simply shrunk
Rubber and PVC gaskets lose a little volume every year they sit compressed and exposed to temperature swings. A gasket that’s shrunk doesn’t look damaged — it’s just thinner than the groove it sits in, so it no longer makes full contact.
One-minute test: pinch the gasket between two fingers. A healthy one resists and springs back; a shrunk one feels noticeably harder, may show hairline cracking, or lifts out of its groove with almost no resistance.
Something knocked the lid sideways
The patent language for this is “lateral shearing force” — plain English, someone stepped on the lid, kicked it moving past it, or pried at it to check the pump and set it back down slightly rotated instead of reseated square.
One-minute test: check whether the lid’s snap points or alignment tabs are all actually engaged, and whether the cover sits centered on the rim rather than shifted a quarter-inch to one side. A lid that’s been bumped often looks fine from above but isn’t actually seated.
If it’s only wet at the pipe or cord, the rim is fine
A grommet-only leak is the simpler repair of the two: a cracked or shrunken grommet, a cord that’s slightly too thick for the hole it was never really sized for, or a pipe penetration that was never pressed in all the way. Check that specific fitting with a flashlight rather than assuming the whole lid needs replacing.
One thing worth ruling out here: a pump that short-cycles, or a pit that’s undersized for how fast water actually arrives, agitates the water inside far more than a normally cycling pump does, and that extra churn is what pushes water up against a marginal grommet in the first place. If the grommet looks intact but keeps weeping anyway, check how the pump is sized to the pit before replacing parts that aren’t actually the problem. A hairline split in the grommet itself can sometimes be closed with a small bead of 100% silicone sealant as a stopgap — not a substitute for a new grommet, but enough to get through until one’s on hand.
A sump lid was never sold as watertight to begin with
This is the part that resets expectations for anyone dealing with a sump pump lid leaking water in the first place. “Sealed” on a sump cover’s packaging and on a retailer’s listing has always referred to keeping gas, radon, and odor from passing through the lid — not to holding back liquid water under any real pressure. Among Jackel’s own flat sump covers — the type most basements actually have — a sealing claim shows up only on the taller radon-dome risers, and even that claim covers the joint where the riser meets the basement floor, not the pipe and cord penetrations in a flat lid itself. No flat-cover product page checked for this article rates one against splashing, agitation, or a rising water table pushing up from underneath.
That’s a real asymmetry worth sitting with: a sump lid snaps or screws down lightly and was built to keep a smell in, not water out under force. A little water finding its way past a cheap gasket during an active pump cycle isn’t the cover failing some spec — there was never a water-tightness spec to fail.
It’s also why this symptom gets confused with two others that aren’t it. Moisture that shows up as damp air or a musty smell in the room, with no actual water pooling on the lid, is usually evaporation through a poorly sealed pit rather than liquid water escaping — a different mechanism with a different fix. And a sewer-gas odor from the same corner of the basement, with no water involved at all, is more often a dry floor-drain trap next to the pit than anything to do with the sump cover. If what you’ve actually got is a smell and not a wet lid, you’re reading the wrong article.
When a new lid is the actual fix
Reseating the cover, replacing the grommet, or running a bead of sealant around a chipped section of rim covers most of this. A full lid replacement earns its place when the gasket channel itself has degraded beyond what a new gasket can fix, or when the lid is visibly warped rather than just dirty or loose.
There’s a telling sign that this failure mode is real and common enough to matter: at least one manufacturer sells a dedicated replacement lid built specifically to stop surface water from getting past a standard cover, using a compressed gasket and cam-lock clamps instead of the usual snap-fit or light screws — a noticeably heavier-duty seal than what ships on most basins. A product built to solve exactly this problem wouldn’t exist if leaking lids were rare. If you’re past spot repairs, our guide to sump pit covers covers what the current flat and radon-dome options actually publish for seals, materials, and the bolt pattern you’ll need to match to your basin.
When this stops being a lid problem
Checking the rim, swapping a grommet, and reseating the cover is reasonable weekend work with the pump unplugged first. Two things push it past that.
If the pump or float cord has been sitting wet where it passes through the grommet long enough that the outer insulation looks chafed, cracked, or discolored rather than just damp, that’s a cord an electrician should inspect or replace — not something to dry off and reuse, since it’s carrying mains voltage into standing water every time the pump runs.
And if drying the lid, fixing the rim, and replacing the grommet don’t stop it — if water keeps arriving from underneath the cover rather than around its edges, or the pit floods faster than the pump can keep up with no storm happening outside — that’s not a lid issue at all. It’s groundwater intrusion or a failing pit/drain-tile system, and it’s a waterproofing contractor’s diagnosis, not a parts swap.
The cover was never the weak point — the expectation was
Chasing a leaking sump lid as if it’s a defective part usually ends in frustration, because most of these covers were doing exactly what they were built and sold to do: keep gas and odor in, not hold back water under pressure. Once you’ve split the symptom into rim versus grommet and checked which one’s actually wet, the fix is almost always smaller than a new lid — a reseated cover, a fresh gasket, or a replaced grommet. Save the full-lid replacement for a warped cover or a degraded gasket channel that a new gasket alone can’t fix.