On this page
- Where the Restriction Usually Starts — Before the Pipe Even Begins
- Why a Smaller Discharge Pipe Diameter Isn't a Small Compromise
- Can Going Bigger Instead Ever Help?
- What Liberty's Own Troubleshooting Table Puts Before Replacing the Pump
- Check Your Pump's Port Before You Buy Any Pipe
- A Check Valve Can Be Its Own Choke Point
- Pipe Sizing and Pump Sizing Are Different Jobs
- Call a Plumber Before You Cut Into Anything Buried or Behind a Wall
- The Pump's Rated Flow Only Holds If Nothing Downstream Is Smaller
Last Updated on October 11, 2026 by umar bwn
The diameter that’s correct isn’t a fixed number — it’s whatever your pump’s own discharge port already is. Step down anywhere past that point, at the fitting or in the pipe itself, and the GPM figure printed on the pump’s box stops describing what actually leaves the house. That’s the whole rule. Most of the work here is finding the places people quietly ignore it without meaning to.
Where the Restriction Usually Starts — Before the Pipe Even Begins
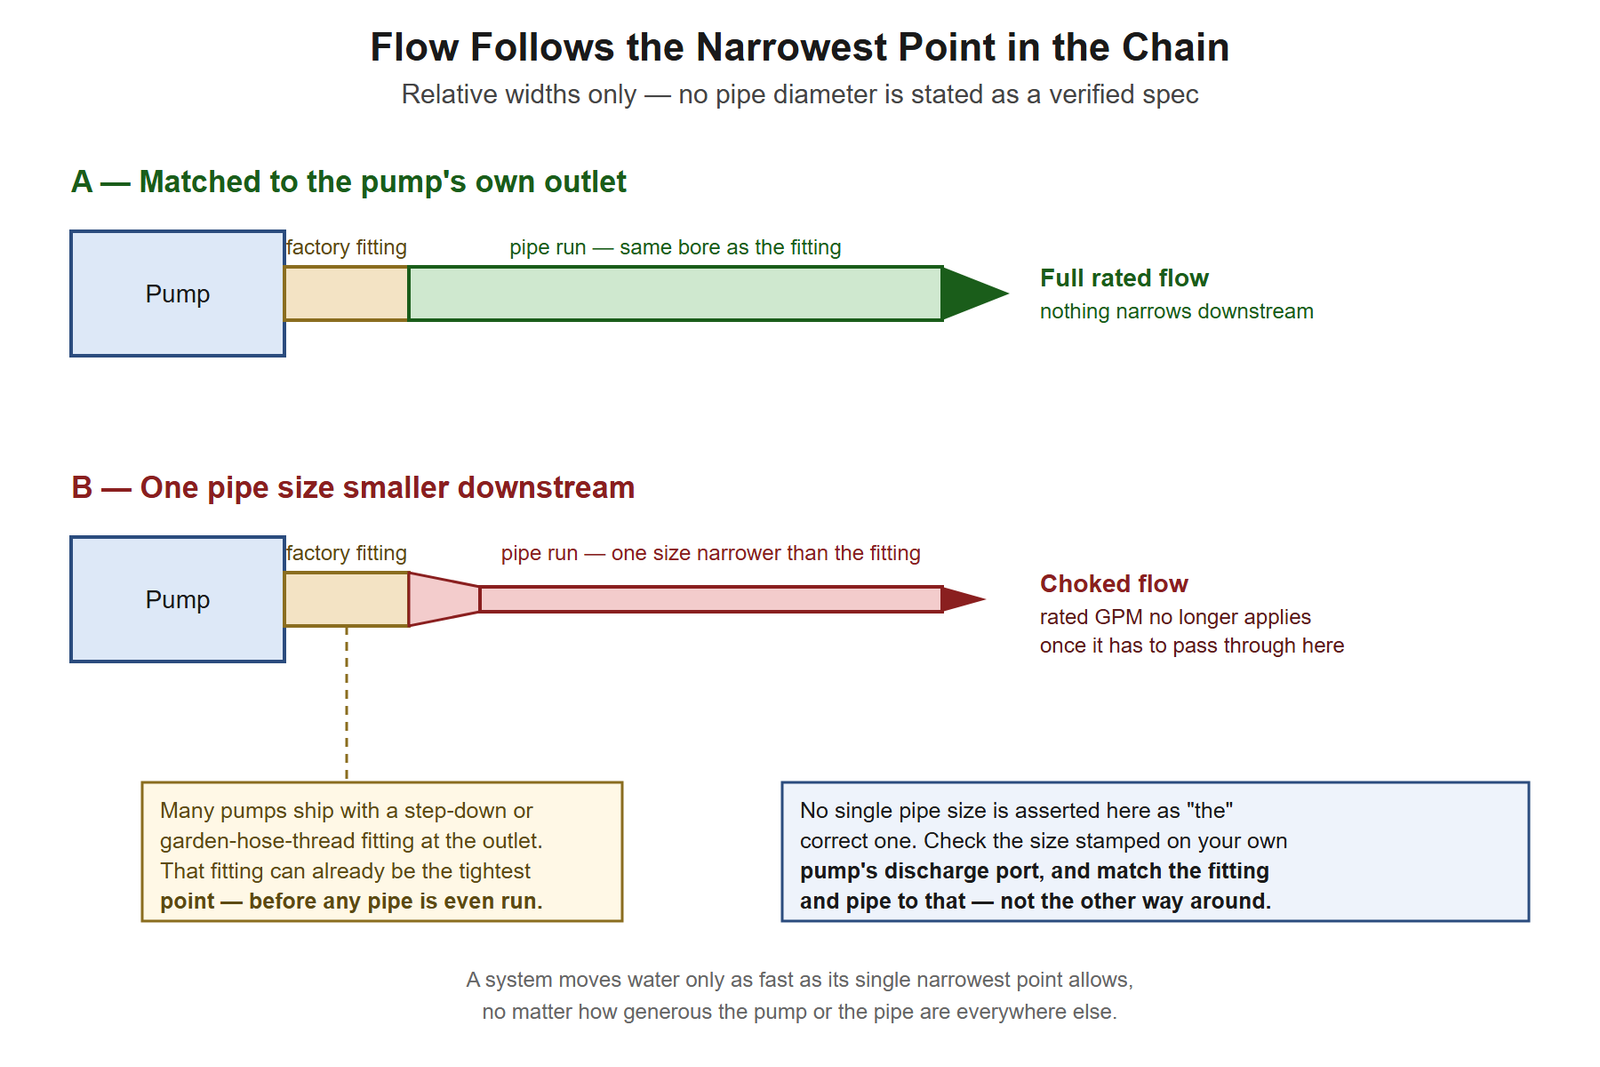
Start at the pump, not at the hardware store. Most residential sump pumps leave the factory with some kind of fitting already threaded into the discharge port — often a step-down adapter, sometimes a garden-hose-thread barb for a temporary drain-down hose. That fitting is part of the flow path exactly as much as any pipe you add after it, and because it’s small and easy to ignore, it’s a common place for the restriction to already exist before a single foot of PVC gets cut.
This matters because the usual framing — “what size pipe should I run” — skips a step. The pipe only needs to match whatever the fitting already is, and the fitting only needs to match the pump’s own port. Size the pipe to a number you read online without checking either of those first, and you can do everything “right” on paper and still have built a bottleneck two fittings upstream of where you were looking.
One-minute test: pull the fitting (or look at it in place) and compare its opening against the pump’s cast or molded discharge port — most pumps have the port size stamped or molded right into the housing. If the fitting’s bore is visibly smaller than the port it’s threaded into, that fitting is already your restriction, independent of whatever pipe comes after it.
Why a Smaller Discharge Pipe Diameter Isn’t a Small Compromise
The instinct is that a pipe one size smaller costs you “a little” flow — close enough, especially over a short run. That instinct is wrong, and it’s wrong by more than people expect. Resistance to flow through a pipe doesn’t scale in a straight line with how much the bore shrinks; standard fluid-dynamics formulas put it on a steep curve, where a relatively small reduction in diameter produces a disproportionately larger jump in friction loss. Halving the bore doesn’t double the resistance. It’s much worse than that.
Practically, that means the pump’s printed GPM-at-a-given-lift figure — which is measured on the maker’s own test rig, through full-size fittings — is read off a curve the installed system has to actually match to mean anything. Add meaningful extra resistance with an undersized run and the pump is still spinning at the same speed, pushing against more resistance than its curve assumes, and the GPM that actually leaves the house drops. No specific multiplier is stated here as a verified figure — the exact number depends on pipe material, fitting count, and run length, and none of that was confirmed against a published friction-loss table this session (see the research note). The direction and the scale of the effect are the part worth remembering: this is not a rounding error.
Can Going Bigger Instead Ever Help?
Sometimes, but it’s not the free upgrade it sounds like. Running a size larger than the pump’s own port doesn’t restrict anything — the bottleneck stays at the pump, not the pipe — so for pure flow, oversizing past the port does nothing extra. What it does change is velocity: the same GPM moving through a bigger pipe moves slower, and a sump pump’s discharge often carries fine sediment, not clean water. Slower velocity gives that sediment more opportunity to settle out in the horizontal run instead of getting carried all the way to the discharge point, which is a maintenance problem a correctly matched pipe doesn’t create. There’s no published velocity threshold for this cited here — it’s a plumbing-hydraulics generality, not a sourced spec — so treat “bigger is safer” as not quite true rather than assuming it either way.
What Liberty’s Own Troubleshooting Table Puts Before Replacing the Pump
This site’s own research into a different but related symptom already turned up a fact worth repeating here. Liberty’s pump manual, covering a sump running but not keeping up with inflow, lists its first remedy for insufficient output as: “Total head beyond pump’s capability. Route discharge piping to a lower level. If not possible, a larger pump may be required.” Sump pump running but the level barely drops covers that full symptom and its other causes in detail — the detail worth pulling forward here is the ordering. The maker’s own fix list puts the piping ahead of the pump, not after it. A pump that looks underpowered is frequently a pump fighting a discharge run — elevation, length, fittings, or diameter — that’s eating into its available head before the water ever reaches outside. Replacing the pump without first checking what it’s plumbed into can mean buying a bigger motor to push through the same undersized bottleneck.
Check Your Pump’s Port Before You Buy Any Pipe
This is the one step that makes everything above actually actionable, and it takes longer to read about than to do.
One-minute test: before you buy a single fitting, look at the pump itself. The discharge port size is almost always marked on the casting or in the manual that came with it. Write that number down. Then check every fitting and every pipe segment between the pump and the point where the line leaves the house against that one number — not against whatever size happened to be on the shelf, not against what the last plumber used on a different job, and not against a number from a forum thread about a different pump. The port is the baseline everything else gets compared to, because it’s the one dimension the manufacturer actually tested against when they published the performance curve in the first place. For this exact pump, the correct sump pump discharge pipe diameter is that number and nothing else — not a size you’ve seen recommended generically, and not whatever the store had in stock.
If you’re buying a replacement pump rather than fixing an existing run, note its port size before the pump arrives — some models step up or down a size from what you’d assume, and knowing it ahead of time means the pipe and fittings are ready rather than becoming a second trip to the store.
A Check Valve Can Be Its Own Choke Point
The check valve sitting in the line is easy to leave out of this math, but it’s a fitting like any other, with its own inlet and outlet sizing printed on the body or the box. Why a sump pump bangs when it shuts off covers what that valve is actually doing mechanically; the piece that matters for sizing is narrower and worth stating on its own — a valve bought to fit “a sump pump” in general, rather than matched to the actual pipe size in hand, is exactly as capable of introducing a restriction as a pipe that’s one size too small. One-minute test: check the valve’s stamped connection size against the pipe on both sides of it before it goes in, the same way you’d check a pipe segment.
Pipe Sizing and Pump Sizing Are Different Jobs
How to size a sump pump walks through matching a pump’s GPM capacity to how fast your pit actually fills — that’s a question about the pump and the pit. This article is a different question: once you have the right pump, does the plumbing between it and the outside world let that pump’s rating actually apply. They’re easy to conflate because an undersized answer to either one can look similar from the basement — water that doesn’t seem to be leaving fast enough — but the two faults don’t behave the same way. A pump that’s genuinely too small for the inflow tends to run constantly during a storm and still lose ground. A correctly sized pump fighting an undersized discharge line tends to show up differently — sump pump short cycling covers a related discharge-side symptom, back-flow past a check valve that’s stuck or struggling against resistance, turning the pump on and off more often than the actual water level calls for. Different signatures, different fixes, and buying a bigger pump doesn’t resolve the second one.
If you’ve confirmed the pump’s own port, every fitting, and the pipe are all genuinely matched — no narrowing anywhere in the run — and the system still isn’t moving enough water, the pipe was never the bottleneck. At that point the question becomes pump capacity on its own terms, and this site’s guide to the best sump pumps compares published GPM-at-head figures across current models rather than relying on the box copy alone.
Call a Plumber Before You Cut Into Anything Buried or Behind a Wall
None of the checking above requires touching anything live or buried — comparing stamped sizes against each other is just looking. Actually resizing a run is a different matter once any part of it is solvent-welded PVC, routed behind a finished wall, or buried between the house and wherever it discharges outside. A botched solvent weld on a pressurized-feeling but gravity-fed line can leak for months before anyone notices it behind drywall, and a buried run that needs rerouting may cross your local code’s rules on where and how a sump discharge is allowed to terminate — rules that vary by state and aren’t something to guess at mid-project. And because the pump itself sits in standing water on its own circuit, any work near the pump’s outlet or cord is a reason to unplug it first and confirm that circuit is the GFCI-protected one it’s supposed to be before anyone’s hands go anywhere near the water. A short re-fit of exposed, above-slab PVC is a reasonable weekend job for most homeowners comfortable with a pipe cutter and primer. Anything buried, behind a wall, or touching the pump’s own wiring is where it’s worth paying a licensed plumber for an afternoon instead.
The Pump’s Rated Flow Only Holds If Nothing Downstream Is Smaller
Get the sump pump discharge pipe diameter wrong anywhere along the run and it doesn’t matter how carefully everything else was chosen. Every GPM figure on a sump pump’s box was measured under one condition that’s easy to forget once the pump is actually installed: nothing in the test rig’s discharge path was narrower than the pump’s own port. The moment something downstream is — a factory fitting, a pipe, a check valve, doesn’t matter which — that number quietly stops describing your installation. None of this requires a bigger pump, a specific pipe size memorized from a chart, or a plumber’s visit in most cases. It requires comparing a handful of stamped numbers against each other before any of it goes together, which is the one step that’s easy to skip and the one step this whole question actually comes down to.