On this page
- Why Bolting a Booster Pump to the Discharge Line Doesn't Work
- Audit What's Actually Going Into That Pit First
- The Tank's Job and the Booster's Job Are Not the Same Job
- The Grundfos SCALA2 Is Built to Self-Prime From a Tank
- Tools and Parts
- Building the System, in Order
- Mark the Non-Potable Line Like a Utility Would
- When to Call an Electrician or a Code Official
- If the Sump Pump Itself Is Already the Weak Link
- A Tank Does the Timing. The Booster Only Delivers Sump Water for Irrigation.
- FAQ
Last Updated on October 11, 2026 by umar bwn
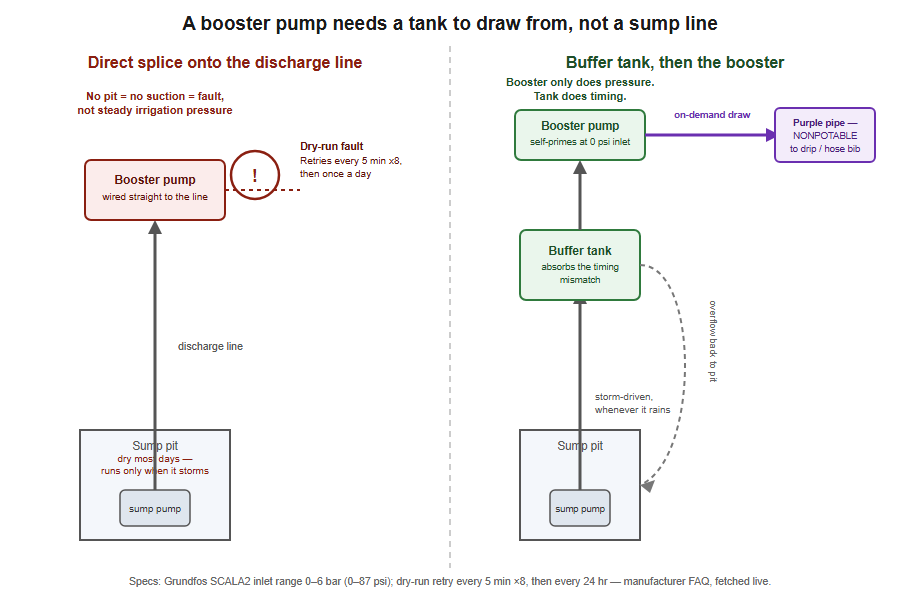
Splicing a booster pump straight onto a sump discharge line doesn’t give you sump water for irrigation — it gives you a pump that faults, because the sump only runs when it’s raining and sits bone dry the rest of the time. A booster wired to that line trips its own dry-run protection and gives up trying within minutes. What actually works is a two-stage build: a buffer tank the sump fills, and a booster that pulls from the tank on its own schedule.
Why Bolting a Booster Pump to the Discharge Line Doesn’t Work
A sump pump’s discharge line is not a water main. It carries water only when the float says so — a few minutes during a storm, then nothing for days. A pressure booster expects the opposite: a source it can draw from whenever the irrigation side calls for it.
Self-priming boosters like the Grundfos SCALA2 build in exactly the protection you’d want on a dedicated water line and exactly the thing that defeats a direct splice: lose suction and the pump shuts down, alerts, and retries every five minutes for eight attempts before dropping back to once a day. That’s the manufacturer’s own fault-recovery cadence — the same alarm language this site’s guide to a booster pump that won’t turn on covers from the electrical side — and it’s built for a pump that occasionally loses a well or a tank, not for a feed that’s dry by design most of the week.
One-minute test, if you’ve already wired one this way: wait until five minutes after the sump last ran, then stand next to the booster. You’ll hear one audible retry attempt, then silence. That click is the dry-run protection doing exactly what it’s supposed to do. It isn’t a bad pump. It’s a pump installed on the wrong kind of line.
Audit What’s Actually Going Into That Pit First
Every gardening blog that touches this topic says the same thing: sump water is “generally” clean groundwater, fine for the lawn, keep it off vegetables without testing. That’s a reasonable default for a pit that only collects foundation drainage. It is not a safe default for every pit, because plenty of sumps in ordinary houses collect more than groundwater.
Walk the pit and trace every pipe entering it before you decide the water is worth reusing at all:
- A thin tube from the furnace area usually means a dehumidifier or condensate line draining into the sump — fine water-quality-wise, but it adds volume on a schedule unrelated to rain.
- A larger line that runs on a timer, often with a faint salty smell after it fires, is a water softener’s regeneration brine. Brine is not something you want on a lawn or a garden bed, and if that line feeds the pit, this whole project is off the table until it’s rerouted.
- A standpipe from the laundry area, usually only running during wash cycles, means some of what’s in the pit is detergent-laden laundry discharge, not plain groundwater.
One-minute test for each: run the suspect appliance (start a wash, or wait for the dehumidifier’s compressor to kick on) and watch the pit. If the level rises outside of weather, you’ve found an input the gardening advice never accounted for. Brine in the mix ends the project as written. Condensate or laundry discharge doesn’t disqualify the water for ornamentals, but it does mean “it’s probably just groundwater” isn’t actually true for your pit, and you should keep it off anything you intend to eat.
The Tank’s Job and the Booster’s Job Are Not the Same Job
This is the part every thin source on this topic skips, and it’s the whole reason a bolted-on booster fails: pressure and timing are two different problems, and they need two different pieces of equipment.
The sump runs on the storm’s schedule — unpredictable, bursty, sometimes nothing for two weeks. Irrigation runs on your schedule — a drip zone at 6 a.m., a soaker line in the evening. Nothing closes that gap except storage. A tank between the sump and the booster absorbs the mismatch: the sump fills it whenever it feels like running, and the booster draws from it whenever you need water, regardless of whether it happens to be raining — which is the only way intermittent sump output turns into dependable sump water for irrigation.
Once the tank exists, the booster’s job is narrow: hold pressure on the outlet side. It doesn’t need to “handle” the sump’s irregular cycle at all, because the tank already did that.
A rough way to size the tank, using your own numbers, not ours: time one sump cycle during an actual storm — how many seconds it runs — and check the gallons-per-minute figure on the pump’s own tag or manual. Multiply the two for gallons per cycle. A tank sized for several cycles’ worth gives the booster something to draw from between storms without running dry on the first dry week. This site’s guide to sizing a sump pump walks through the same kind of storm-inflow math if you want to work from a real number instead of a guess.
The Grundfos SCALA2 Is Built to Self-Prime From a Tank
Most booster pumps sold for home use are built to live on a pressurized city line and assume there’s always something behind them. That assumption is exactly backwards for a tank-fed setup, where the inlet side sees zero pressure most of the time.
Grundfos publishes the SCALA2’s inlet pressure range as 0 to 6 bar (0 to 87 psi) and describes it directly as able to run “from a storage tank or well with low or zero pressure” — which is the manufacturer’s own description of the tank-feed topology this project needs, not a repurposed line-pressure booster being asked to do something it wasn’t built for. Several resellers list its maximum head in the neighborhood of 148 feet, though Grundfos’s own spec booklet wasn’t readable to confirm that number directly this session — treat it as a ballpark worth double-checking against the current data sheet before you buy, not a hard cutoff.
Whatever booster you land on, check the same two things this one happens to publish clearly: a stated minimum inlet pressure of zero (not “low,” zero), and a dry-run fault that recovers on its own instead of locking out until someone resets it by hand.
Tools and Parts
- A storage tank or clean drum sized to several sump cycles (see above) — food-grade plastic is fine since this water never touches a drinking line
- A booster pump rated for zero-pressure/tank inlet feed, with a strainer or basket screen at its own pickup — sump water carries fine sediment a booster’s internals don’t like
- An overflow fitting and a short length of pipe to send excess back to the sump pit or a floor drain
- Purple pipe, purple identification tape, or “CAUTION: NONPOTABLE WATER” tags for every exposed run and outlet
- A GFCI-protected outlet or circuit for the booster
- Teflon tape, pipe cutter, and whatever fittings match your tank and booster’s threads
Building the System, in Order
- Confirm the pit’s inputs are fit for this using the audit above. Stop here if brine is in the mix.
- Set the tank somewhere the sump’s existing discharge line can reach without rerouting the whole run, with room underneath or beside it for the booster.
- Redirect the sump discharge into the tank, not into the booster. The sump pump keeps doing exactly what it already does — it just empties into storage instead of straight outside.
- Plumb an overflow from the tank back to the pit or to a floor drain, above the tank’s working fill line, so a tank that’s already full during a long storm doesn’t just back up or spill wherever gravity takes it.
- Mount the booster below or beside the tank, with its pickup line screened, and let it draw from the tank’s outlet rather than from the sump line directly.
- Run the booster’s output to a dedicated outdoor line — new pipe or tubing, not a tee into anything that also carries household water.
- Label every foot of that line and every outlet before you bury or hide any of it. This is the step every DIY writeup on this topic skips entirely.
- Power the booster from a GFCI-protected circuit, fill the tank, and bleed air from the booster per its own startup instructions before you ever ask it to run dry.
Mark the Non-Potable Line Like a Utility Would
Municipal reclaimed-water systems — the ones that actually pipe treated wastewater to homes and parks for irrigation — settled this question decades ago: every run and every outlet on a non-potable system gets marked, consistently, so nobody downstream mistakes it for a drinking line. Washoe County’s own reclaimed-water connection notes spell out the convention in full: purple pipe or purple identification tape marked “CAUTION: RECLAIMED WATER LINE” at intervals of five feet or less, with a purple tag reading “WARNING: RECLAIMED WATER — DO NOT DRINK” on every aboveground fitting — the same pattern shows up, worded almost identically, at utilities all over the country.
Nobody writing about backyard sump reuse mentions this, probably because that content comes from gardening writers, not plumbing writers. But the underlying logic — a non-potable line should never look like, or get tied into, a potable one — applies exactly as much to a one-zone DIY drip system as it does to a municipal reclaimed-water main. Buy the purple tape. Tag the hose bib. If you ever sell the house, the next owner needs to know not to drink from that spigot or connect it to anything that does.
When to Call an Electrician or a Code Official
This project touches two things that aren’t DIY-optional everywhere: a powered pump on a new circuit, and a water system a code inspector might classify as “non-potable reuse” depending on your jurisdiction.
If there’s no existing GFCI-protected outdoor or garage outlet within reach of the booster, running new circuit is an electrician’s job, not an extension cord’s — the same NEC logic this site already covers for a primary sump pump applies here. And before you plumb any part of this anywhere near a line that also carries drinking water — even in the same trench, even just nearby — call your local code office first. Cross-connection rules exist precisely to keep a non-potable project like this one from ever becoming a path backward into the house’s water supply, and that’s a question worth a five-minute call, not a guess.
If the Sump Pump Itself Is Already the Weak Link
Everything above assumes your existing sump pump can keep doing its normal job while also filling a tank on top of it. For most residential sumps that’s true — you’re not asking the pump to run longer or more often, just to empty into a different place. But if your sump is already marginal — short-cycling, barely keeping up in a hard rain, or audibly straining — adding a tank to the mix isn’t the fix for that. This site’s guide to the best sump pumps covers what to look for if the primary pump needs replacing before you build anything on top of it.
A Tank Does the Timing. The Booster Only Delivers Sump Water for Irrigation.
That’s the whole correction this topic needs. Every thin source treats “get a booster pump” as the answer by itself, and every one of them is missing the piece that actually makes it work. The booster was never the hard part — Grundfos and similar makers already sell one rated to run from zero pressure. The hard part nobody names is that a sump cycles on the weather and irrigation runs on a clock, and only a tank between them makes those two schedules stop fighting each other. Get the tank sized and the pit audited first, and turning that into usable sump water for irrigation is the easy, boring last step.
FAQ
Is sump pump water actually safe to put on a vegetable garden?
Treat it the way extension offices generally do: fine for lawns and ornamental beds without much worry, but hold off on edible crops unless you’ve had the water tested. If your pit audit turned up softener brine, laundry discharge, or anything beyond plain groundwater, keep it off food crops regardless of what a test says, and reconsider ornamentals too if brine is involved.
Can I just tee this into my existing sprinkler system?
Don’t tie a sump-fed line into any irrigation manifold that’s also connected, even indirectly, to your home’s potable supply. Run this as its own dedicated zone — a separate hose bib or a standalone drip line — so there’s no path for non-potable water to ever end up pushed backward into drinking water. That separation is also most of what a code official will be checking for if this ever comes up.
How long does the tank need to hold water before it goes stale?
There’s no single published shelf life for stored sump water, and it depends on temperature and how often the tank turns over. As a practical habit, size the tank to the gap between storms rather than for long-term storage, and don’t let water sit for weeks in warm weather without using or refreshing it — stagnant standing water grows things you don’t want on a garden bed regardless of where it came from.