On this page
Last Updated on October 27, 2026 by Muhammad Toqeer
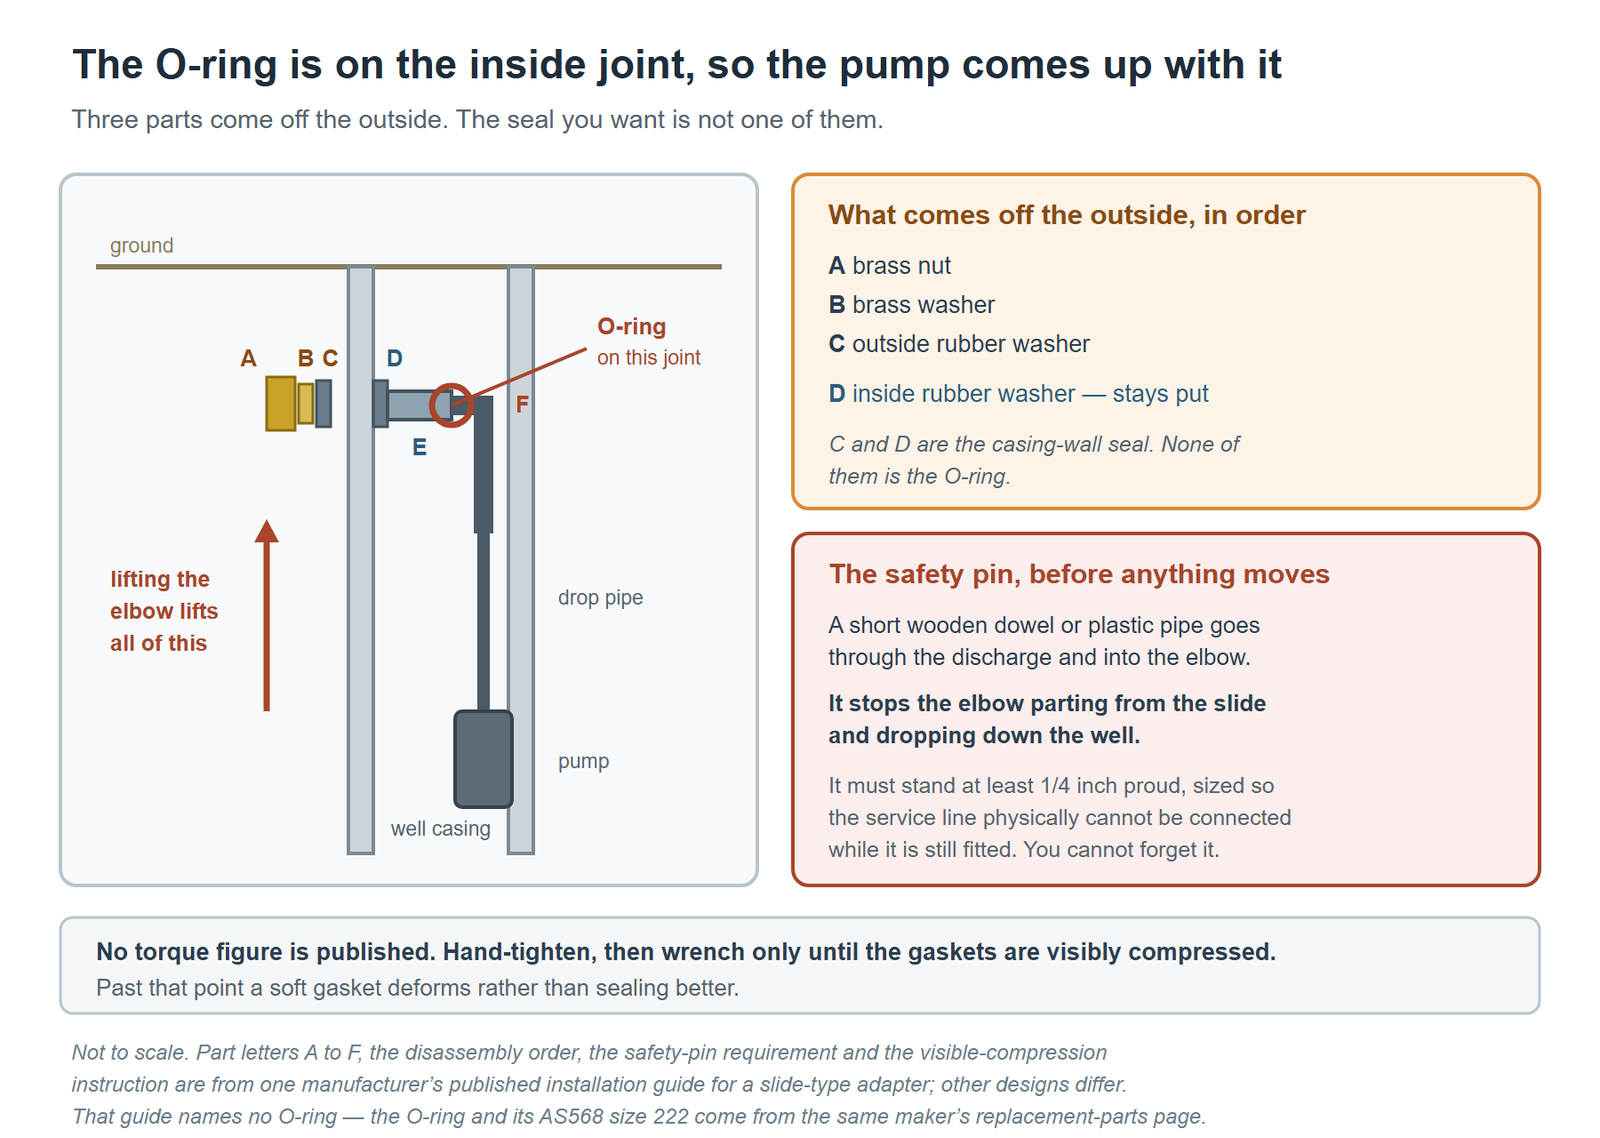
The O-ring does not sit on the outside of the casing where you can reach it. It seals the joint where the elbow plugs into the slide, inside the casing — and the drop pipe and pump hang off that elbow. Reaching the O-ring means lifting the pump column. That single fact decides whether this is your afternoon or a contractor’s.
Which seal has actually failed?
There are two, they fail differently, and only one of them is the O-ring.
The O-ring seals the slide joint — the plug connection between the elbow and the slide. The manufacturer lists it as part 09-P-100-OR-222, and describes it as “a readily available, ‘off the shelf’ O-ring made to AS568 North American Standard” in size 222.
The casing-wall gasket is a different part entirely, sold as kit 09-P-100-RGK. Its job is sealing where the adapter passes through the hole cut in the casing wall, and in the manufacturer’s own installation sequence those are the rubber washers either side of the casing — the outer one that comes off with the brass nut, and the inner one that stays pressed against the inside wall.
Water at the outside of the casing is more often the gasket. Water that appears when the pump runs, with the outside dry, points at the slide joint. If you have not separated those yet, start with what actually leaks on a pitless adapter before ordering anything.
Why can the O-ring not be reached from outside?
Because of what is bolted where.
The slide stays fixed through the casing wall. The elbow plugs into it. The O-ring is on that plug joint, inside the casing. Nothing you undo on the outside exposes it.
To get at it, the elbow has to come up out of the slide — and the drop pipe and the submersible pump are attached below the elbow. Lifting the elbow lifts the whole column. That is why a part costing a few dollars turns into the same job as pulling the pump.
Before you commit, confirm the adapter family. Boshart identifies the P-100 as discontinued, with the P-100NL no-lead version as its successor, and states plainly that “P-100 and P-100NL parts are not interchangeable with the PA-100 and PA-100NL Pitless Adapters!” One letter in the model name is the difference between the right seal and a return.
What does the manufacturer’s own sequence look like?
This is the published installation order, read backwards for removal. It is worth knowing even if a contractor does the work, because it tells you what they are doing and why.
From the outside, three parts come off in order: the brass nut, then the brass washer, then the outside rubber washer. The inner rubber washer stays against the inside of the casing.
Then the safety pin goes in. This is the step that matters most and the one with no second chance. Before the elbow can be separated from the slide, a short piece of wooden dowel or plastic pipe is pushed through the pitless discharge and into the elbow. It stops the elbow parting from the slide and dropping down the well.
The manufacturer is specific about sizing it: it should protrude at least a quarter inch from the discharge connection and be of sufficient diameter, “in order to ensure that it is impossible to make the service line connection without removing the safety pin.” The pin is designed so you cannot forget it — it physically blocks the next step.
Then the lift pipe does the work. A steel lift or pull pipe threads into the top of the elbow. The pin comes out, the elbow is drawn up out of the slide and up through the casing, and the pump column comes with it.
Going back together, seating is the whole job. The column is lowered until the elbow re-seats in the slide, and the manufacturer’s instruction is to “make sure you firmly position it into the slide before disconnecting from the pull pipe.” Disconnect before it is seated and the column is held by nothing.
How tight is the brass nut supposed to be?
There is no torque figure, and that is deliberate.
The published guidance is to hand-tighten first, “ensuring the washer contour is aligned with the casing profile”, then “tighten the brass nut using a wrench until the gaskets are visibly compressed.”
Visible compression is the whole specification. There is no number to hit, which means there is also no number to exceed — and on a soft gasket against a curved casing wall, over-tightening deforms the seal rather than improving it. If a joint still weeps at visible compression, the gasket is the problem, not the torque.
The same page carries a hard prohibition from the hole-cutting step that is worth repeating: “Do not use a cutting torch to cut the hole in the side wall of the well casing!”
What goes wrong on the way back down?
Three things, in the order they bite.
The column is heavier than people expect. Drop pipe, pump, and the water standing in the pipe all hang off that elbow. The joint torque on the drop pipe exists because of the same load, and it is the reason this job is usually two people and a proper pull pipe rather than one person and enthusiasm.
The elbow can be set down without being seated. It can feel home and not be. The published instruction — firmly positioned before disconnecting — exists because this is the failure that drops a pump.
The seal is checked too late. The manufacturer’s last step is to “check for leaks prior to back filling the trench.” Backfill first and the next check costs a second excavation.
Is the part even the right one?
One detail from the manufacturer that saves a wrong order: the O-ring size number 222 was molded on the pitless elbow casting in 2002. Older castings do not carry it.
So if you can read 222 on the casting, you have confirmation. If you cannot, the adapter predates the marking and the model has to be identified another way — which is a good moment to decide whether a seal kit or a whole adapter is the better buy, given the pump is already out of the well.
When this needs a pro
Honestly, most of the time.
This is a pump pull with a seal change attached. Get a well contractor if the pump is deep, if you do not have a pull pipe and a way to support the column, if the casing is corroded around the penetration, or if the adapter is an older casting you cannot identify. A contractor on site can also tell you in one look whether the casing hole itself has worn oval, which no seal will fix.
If the pump is coming out anyway, that is the moment to deal with everything down there at once — the seals, the drop pipe joints, and the adapter itself.
FAQ
Can I replace the O-ring without pulling the pump?
No. The O-ring is on the joint between the elbow and the slide, inside the casing, and the elbow has to come up out of the slide to expose it. The pump hangs below the elbow and comes up with it.
Is the O-ring the same part as the casing gasket?
No. They are sold separately — the O-ring as 09-P-100-OR-222 and the casing seal as gasket kit 09-P-100-RGK — and they seal two different joints that fail in different ways.
Can I use any size 222 O-ring from a hardware store?
The manufacturer describes it as an off-the-shelf AS568 size 222, which is a standard dimension rather than a proprietary part. The caution is the model family, not the size: P-series and PA-series parts are explicitly not interchangeable.
What is the safety pin for?
It stops the elbow separating from the slide and falling down the well while the outside fittings are off. It is sized to protrude far enough that the service line cannot be connected while it is still fitted, so it cannot be left in by accident.
How tight should the brass nut be?
Hand-tight with the washer contour aligned to the casing, then wrench-tightened only until the gaskets are visibly compressed. No torque figure is published, and past visible compression a soft gasket deforms rather than seals better.