On this page
Last Updated on September 25, 2026 by Muhammad Toqeer
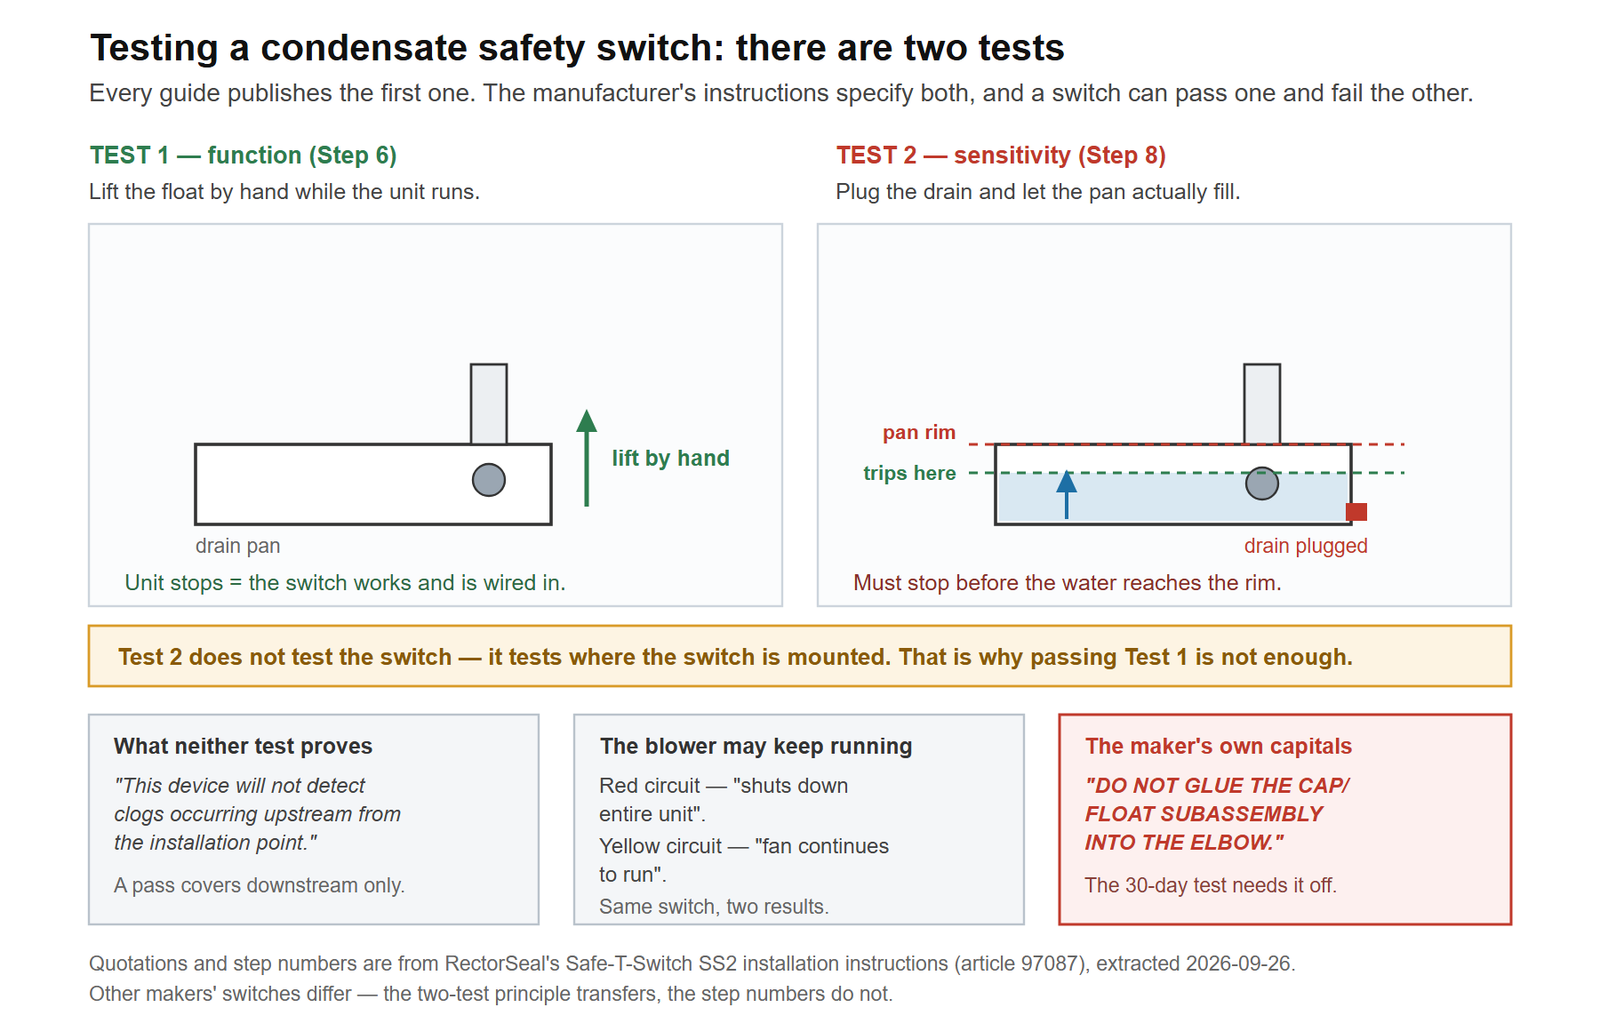
Every guide gives you one test: lift the float, the system should stop. That test is real, and it is not enough. It proves the switch works and is wired to something. It cannot prove the switch will act before your pan overflows — because that depends on where the switch is mounted, not on whether it works.
RectorSeal’s own instructions specify two tests, as consecutive numbered steps. Almost nobody publishes the second one.
First, make sure you are testing the right device
Two different things get called “the safety switch”, and the test is not the same.
The switch inside the pump. A second float in the pump’s own tank, wired to a pair of leads. If that is what you are chasing, the terminals and the field check are here — and raising each float by hand is how you tell the two floats in that tank apart.
The separate switch in the pan or the drain line. A RectorSeal Safe-T-Switch, a Little Giant ACS, or the assembly that retrofits one. That is what this article tests.
Test 1 — does the switch work?
This is the one everybody knows, and it is RectorSeal’s step 6:
“Rotate the two Cam Locks to the UNLOCK position. Remove the Cap/Float Subassembly from the Elbow. Test the switch by lifting the Float while the unit is running. If wired correctly, the unit will stop.”
So: get the system running, lift the float, and watch.
Hold it up for a full minute. Plenty of systems carry an internal blower delay and run on for thirty to sixty seconds after the signal arrives. Letting go after five seconds tells you nothing.
What “the unit will stop” looks like is not fixed — and this is where most homeowners misread the result. See below.
If the system does not stop at all, the switch or its wiring has failed. RectorSeal offers no repair path: “If this product failed function test, replace it with a new one.”
Test 2 — will it act in time?
Here is the step nobody repeats. RectorSeal’s step 8 is headed “Test switch sensitivity”, and it begins:
“Test switch sensitivity: Plug drain downstream from…”
Plug the drain below the switch, run the unit, and let the pan genuinely fill. The float should rise on the real water and stop the unit before the water reaches the rim of the pan. If the pan overflows first, the switch is mounted too high — and it passed test 1 anyway.
That is the whole point. Test 2 does not test the switch. It tests where the switch is. A perfectly good switch sitting an inch too high is a switch that will trip while your ceiling is already getting wet.
The fix is physical, not electrical. RectorSeal’s own remedy is to check the float stem is at the inside bottom of the elbow, and to reposition the assembly lower or angled down from the pan outlet. The stem itself is the adjustment:
“It is recommended to push the Stem to the bottom position for the most sensitive water detection. If sensitivity needs to be adjusted, move the stem up or down accordingly.”
Push the stem down for the earliest possible trip. Raise the stem, or the whole assembly, only if it is nuisance-tripping on normal condensate.
Have towels and a wet vacuum ready before you plug anything. You are deliberately making a pan fill, and the failure mode of this test is water on the floor.
Why the blower carrying on is not a failure
This trips people up more than anything else on this job.
What stops when the switch trips depends entirely on which wire it was spliced into, and RectorSeal spells out both options:
“Incorporating switch in red circuit shuts down entire unit. If placed in the yellow circuit, fan continues to run (to inhibit mold growth during long absences.)”
So the same working switch gives two different test results. On a red-circuit install everything stops. On a yellow-circuit install the compressor stops and the blower keeps running on purpose — that is the design, not a fault.
Trane describes its own air handler switches as shutting down the compressor, the condenser fan and the supply fan, which is red-circuit behaviour. Your install may not match. Before you condemn a switch because the fan kept turning, find out which circuit it is in. Which one you should have is a choice made at purchase, and it is covered in the buying guide.
One more timing quirk: after you release the float, the system usually will not restart instantly. Most equipment holds a roughly five-minute anti-short-cycle delay. That is normal.
What neither test proves
A passed test is narrower than it feels, and the manufacturer says so plainly:
“This device will not detect clogs occurring upstream from the installation point.”
A switch in the auxiliary pan protects you from a blockage below it. It knows nothing about a clog between the coil and the switch. That is why the position question — which pan, which line, how many switches — is a separate decision from whether the one you have works, and it is why a pump that keeps shutting the AC down when it fills may be reporting a problem the switch itself cannot see.
This is a 30-day job, not an annual one
Worth saying because the interval is much shorter than people expect, and it comes from the manufacturer:
“Open the Cap/Float Subassembly to inspect, clean and test this device at least every 30 days and following every cleaning of the drain line.”
The routine RectorSeal gives is five steps: remove the cap and float subassembly, clear debris inside the tee and around the stem, check for damage, run the function test, and reinstall. Damage means replacement, not repair.
Which leads to the instruction that is printed in capitals and ignored constantly:
“DO NOT GLUE THE CAP/FLOAT SUBASSEMBLY INTO THE ELBOW.”
The monthly maintenance requires taking that subassembly off. Glue it, and you have made the manufacturer’s own test impossible without destroying the device. If yours is already glued in, that is worth knowing before you start twisting.
When this needs a pro
The switch sits in a 24-volt control circuit, and you are working near equipment that starts by itself. RectorSeal’s caution is to “disconnect power supply before installing this product to avoid electrical shock” — and testing means the power is on, which is the opposite. Keep your hands to the float and the pan.
If it fails the function test, the replacement is wiring work. Splicing into the right circuit is what decides whether the interlock protects anything, and it is inspected work in many jurisdictions.
If it fails the sensitivity test, moving the assembly means opening the drain. On a glued PVC tee that is a cut-and-refit job.
And if you have no switch at all, that is a code question before it is a product question — the condensate pumps guide covers what the arrangement is supposed to include.
FAQ
How do I test an AC float switch?
Two tests. Lift the float by hand while the system runs and hold it a full minute — the unit should stop. Then plug the drain below the switch, let the pan fill with real water, and confirm the unit stops before the water reaches the rim. The first proves the switch works; the second proves it is mounted low enough to matter.
My compressor stopped but the blower kept running — did the test fail?
Probably not. A switch wired into the red circuit shuts the whole unit down; one wired into the yellow circuit stops the compressor and lets the fan keep running deliberately, to inhibit mould. Find out which circuit yours is in before replacing anything.
How often should a condensate safety switch be tested?
RectorSeal asks for the float subassembly to be opened, inspected, cleaned and function-tested at least every 30 days, and again after every cleaning of the drain line. That is far more often than most homeowners assume.
Can a condensate safety switch pass a test and still let the pan overflow?
Yes, and that is the reason for the second test. Lifting the float only proves the switch and its wiring work. If the switch is mounted too high, water reaches the pan rim before the float rises far enough — so it trips, correctly, too late.
What if my safety switch is glued in?
Then the manufacturer’s monthly inspection cannot be performed as written, because it requires removing the cap and float subassembly. RectorSeal’s instructions say in capitals not to glue it. Forcing a glued cap usually destroys it, so treat it as a replacement job rather than a maintenance one.