On this page
- Locate the leak before you open anything
- It might not be the macerator at all
- The lid or a clamp wasn't reseated properly
- Water at the vent: the two-way air problem
- A worn non-return valve lets pumped water find its way back
- Bowl cleaner has gone after the rubber outlet
- When replacement is the answer
- When this needs a pro
- FAQ
Last Updated on October 17, 2026 by umar bwn
Water shows up somewhere specific on a macerating toilet, and where it appears decides what’s actually wrong. At the vent cap, that’s a pressure problem, not a crack. At the lid seam, it’s a reassembly problem. At the base, a worn seal inside. No water until the fixture upstream runs means it was never the macerator at all.
That’s the whole diagnostic, and it’s worth running before you touch a clamp or a screwdriver, because the pump itself — the motor and the cutting blade — is responsible for exactly none of the five things that actually cause this.
Locate the leak before you open anything
Wipe the entire unit bone dry: the case, the lid seam, every hose clamp, the vent fitting at the top, and the floor underneath. Note the time. Then run one single flush — not a few, just one — and watch, rather than walking away.
- Water appears at the vent cap or the vent pipe fitting, with everything else still dry. Skip to the vent section below; this is a pressure problem, not a crack in the case.
- Water appears at the lid seam, tracing down the outside of the case from the top edge. The lid isn’t sealed. See the reseating section.
- Water appears low on the case itself, or at the discharge outlet fitting, with the lid and vent both dry. That’s a seal or valve failure inside. See the non-return valve and the rubber outlet sections.
- Nothing on the unit is wet at all, but there’s still water on the floor nearby, and it showed up before or during the flush rather than after the pump ran. It isn’t the macerator. Go to the next section first.
This sequence matters because it rules out the most time-consuming possibility — opening the case — last, not first. Three of the five real causes are outside the pump body entirely.
It might not be the macerator at all
The toilet’s supply line, the fill valve inside the tank, and the tank-to-bowl gasket are all mounted directly above or beside the macerator unit, and a drip from any of them runs straight down onto the case. From a few feet away, in poor basement lighting, that looks identical to the unit itself leaking.
One-minute test: after you’ve dried everything and run one flush (above), also check the toilet separately — flush again and watch the tank refill, and look specifically at the base of the tank and the supply line connection while it’s filling, not just at the macerator below.
If the water traces back to the tank refilling rather than to the macerator running, you’re chasing a standard toilet fill-valve or gasket leak, which is a five-dollar part and has nothing to do with the macerating unit. Fix that first, dry everything again, and recheck before assuming the pump needs attention at all.
This is also worth ruling out if you’re not entirely sure what’s under the floor in the first place. A self-contained macerating unit bolted directly behind the toilet is a different machine from a separate sewage ejector pit under the basement floor, and our guide to how the whole system works walks through which one you actually have before you diagnose either.
The lid or a clamp wasn’t reseated properly
If the unit has been opened recently — to clear a jam, replace a part, or just to look inside — and started leaking afterward, start here before anything else. The lid on these units is typically bolted or clamped down against a gasket, and it only takes the bolts going back on slightly uneven, or the gasket sitting a fraction out of its groove, for water to weep along the seam under pump pressure.
The same logic applies to the external hose connections on the inlet and discharge sides. A clamp that’s loose, corroded, or simply not torqued back down after service will show the same symptom — a slow weep rather than a spray, usually worst right after the pump cycles. (If you’re reading parts diagrams or manuals written for the UK market, note that a “jubilee clip” is simply a hose clamp — same part, different name.)
One-minute test: with the case dried off, look and feel along the entire lid seam and every visible clamp while a helper flushes. A weep that starts exactly where a clamp or the lid gasket sits, rather than from a seam in the plastic itself, points here.
Fix: reseat the lid evenly — bolts torqued in sequence, not one side first — or replace a clamp that’s visibly corroded or won’t tighten past hand-snug. This is the cheapest of the five causes and the most common reason a unit leaks right after it’s been serviced.
Water at the vent: the two-way air problem
This is the cause almost nothing written about these units explains properly, and it’s worth understanding rather than just fixing, because the wrong vent will leak again even after you dry it out and reseat everything else.
A macerating toilet’s case is a sealed chamber, and air has to move through it in both directions for the thing to work at all. Saniflo’s own installation instructions put it plainly: the system “needs a two-way air movement, OUT when the toilet is flushing… and IN when the macerating unit is pumping water out of the case.” Water comes in when you flush, which pushes air out through the vent. The pump then pushes that water back out, which means air has to come back in through the same vent to replace it — or the case pressurizes on every single cycle.
That’s exactly why the same installation instructions are specific about what the vent can’t be: “Do NOT use air admittance valve (also known as cheater vents) because these are one-way devices.” An AAV is a perfectly normal, code-legal way to vent an ordinary sink or toilet, which is precisely why an installer unfamiliar with macerating units sometimes puts one on this system too, assuming any vent satisfies the requirement. It doesn’t. An AAV opens to let air in but stays shut against air trying to leave — which is backward from what this unit needs on the pump-out half of its cycle.
Nobody writes down in so many words that this is what eventually makes the case leak. But it follows from the two facts above on its own: air that can’t escape through a one-way vent has nowhere else to go except back out through whatever seam in the case is weakest — the vent fitting itself, or the lid gasket right next to it. Treat that as this article’s explanation for the mechanism, not as a quoted spec, and verify against your own unit’s actual vent hardware before you act on it.
There’s a tell you can check before it ever gets as far as leaking. One installer working through exactly this mistake on a trade forum described the before-and-after directly: with an AAV installed, “the toilet drains fairly slowly, with the pump running for about 5 seconds per flush”; after opening a true vent, “it flushes instantly and the pump runs just a second or two.” A pump that runs for several seconds on an ordinary flush, rather than one or two, is telling you the vent is wrong before a drop of water ever shows up outside the case. If yours has been running long and slow for a while rather than just starting to leak, our guide to a macerating toilet that won’t flush at all covers what happens when that same restriction gets worse instead of catching it here.
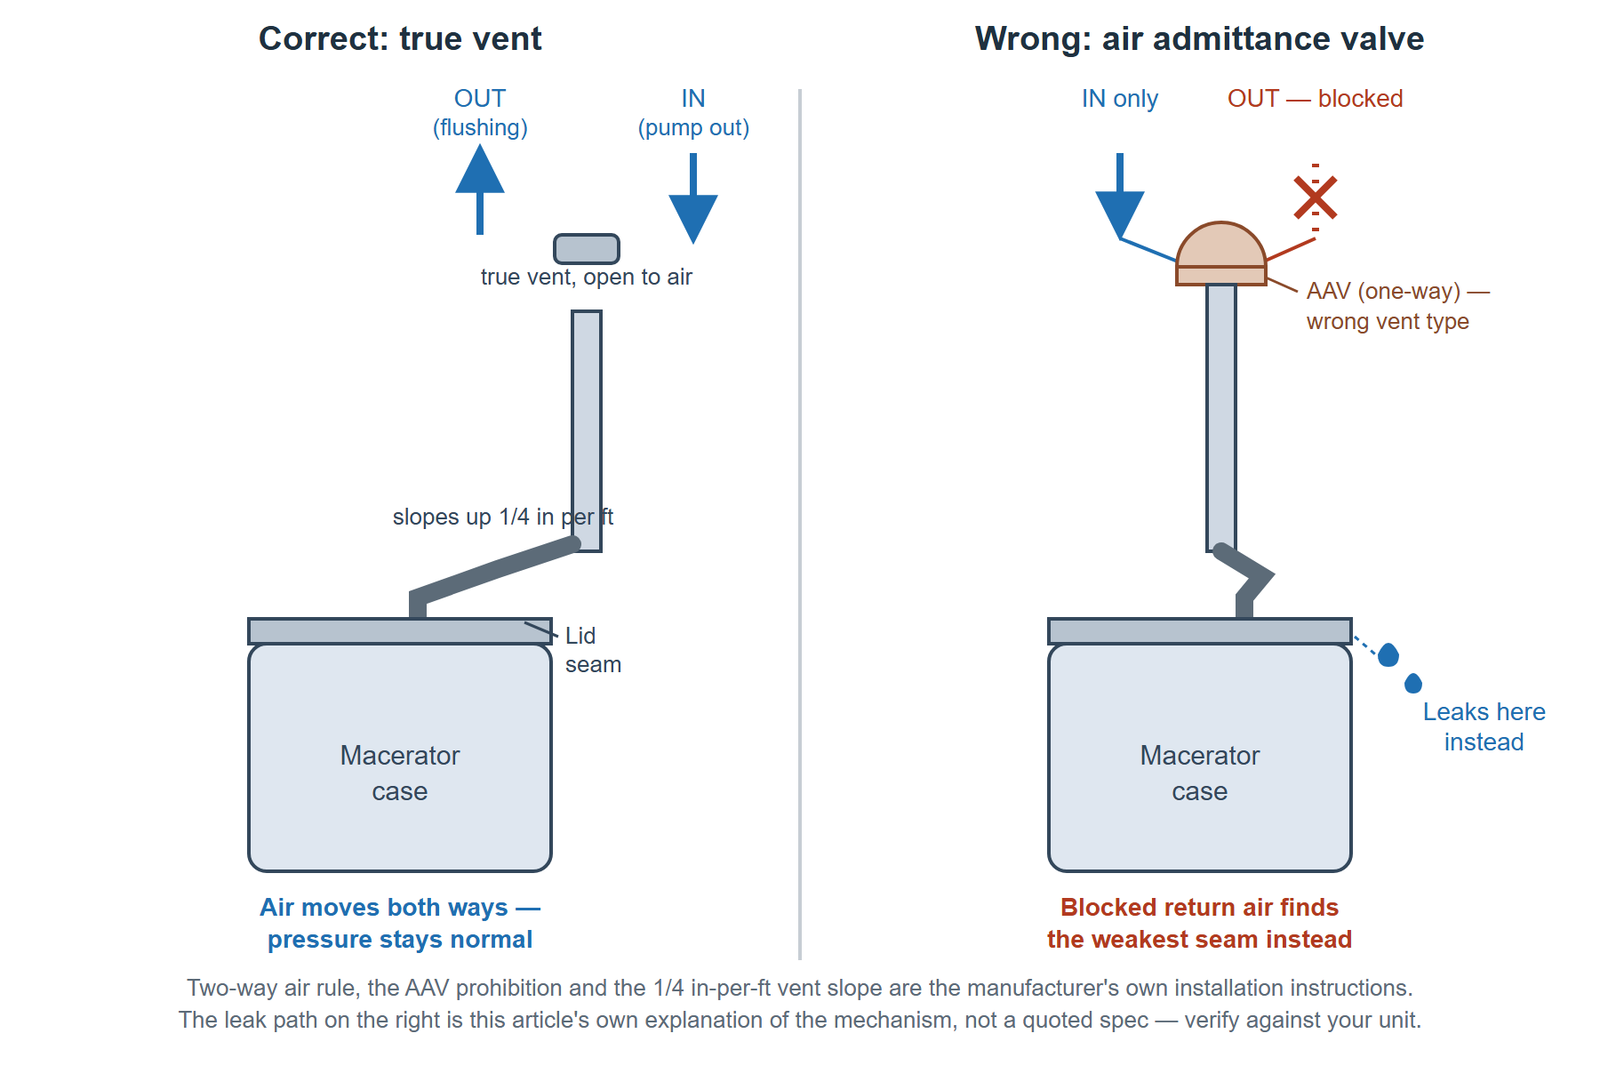
The fix, if this is yours, isn’t a tube of sealant. It’s correcting the vent itself: remove the AAV and run a true vent to open air — through the roof or tied into another vent stack per your local plumbing code — sloped upward at least ¼ inch per foot anywhere it runs horizontally, which is the same installation instructions’ own figure for the vent line. (That slope spec belongs to the vent pipe, not the discharge line — the discharge line has its own, separate fall requirement, and the two are easy to mix up if you’re reading a generic macerating-toilet install sheet rather than this unit’s own diagram.)
A worn non-return valve lets pumped water find its way back
Every macerating unit has a check valve on the discharge side, stopping waste that’s already been pumped out from draining back into the case between cycles. When the rubber flap or seat wears, pits, or gets a sliver of debris caught in it, it stops sealing fully, and water sits against it rather than staying out in the discharge line — which raises the resting water level inside the case. Eventually, that shows up as weeping at the base rather than a sudden flood.
One-minute test: after a normal flush and pump-out, wait several minutes with nothing else run, then open the inspection point on the discharge line (or, if the valve housing is external and accessible, watch it directly). Water draining backward into the case during that quiet period — rather than staying out in the line — confirms the valve, not a case crack.
Fix: the valve is a wear part on these units and is meant to be replaced on its own, not alongside the whole pump. If you’re comfortable opening the discharge-side housing, it’s usually a straightforward swap; if you’ve never had the case open before, this is a reasonable point to call in whoever services these units locally rather than guessing at reassembly.
Bowl cleaner has gone after the rubber outlet
The rubber discharge outlet and the internal seals on these units are a specific rubber compound, and aggressive bowl cleaners — the thick gel kind clipped to the rim, and chlorine-based tablets dropped in the tank — are harder on that rubber than on vitreous china. Over time the compound can swell, soften, or craze, and when it does, the leak shows up specifically at the outlet fitting itself rather than as a general weep across the case, because that’s the one place the rubber is doing structural sealing work rather than just cushioning a joint.
One-minute test: look at the outlet fitting where the rubber meets the rigid discharge pipe. Rubber that looks swollen, unusually soft, or has fine surface cracking compared to a new unit’s firm, smooth fitting is the tell — a cracked or dried-out case fitting looks and feels different (brittle, not swollen).
Fix: replace the outlet fitting on its own if the rest of the unit tests sound. Going forward, use a plain toilet-bowl cleaner rather than a continuous rim-hung gel or dissolving tablet upstream of a macerating unit — ordinary cleaning, applied and flushed rather than left sitting in contact with the rubber continuously, is easier on these seals.
When replacement is the answer
If you’ve worked through the test above and more than one of these is true at once — a check valve that’s worn, an outlet that’s degraded, and a case that’s several years old — you’re looking at a unit near the end of its service life rather than a single part failure. Stacking two internal repairs on an older unit is often close to the cost of a new one, and a new unit resets the clock on all of its wear parts at once rather than one at a time.
If that’s where you’ve landed, our upflush toilet buying guide covers discharge-size differences between models, lift ratings, and which units are still in production — worth reading before you replace like-for-like, since not every current model matches your old one on lift height.
A leak by itself, with everything else testing sound, is not a reason to replace the whole unit. Fix the one part that’s actually failing.
When this needs a pro
The case holds macerated sewage under a sealed, bolted lid, and the unit draws line voltage to run the motor. If you need to open the case to inspect the check valve or the outlet, unplug the unit at the outlet first — don’t just stop it mid-cycle — and treat anything inside as contaminated; this isn’t a job to do bare-handed. If the leak turns out to be the vent and the fix means running a new vent pipe through a wall, a floor, or the roof, that’s governed by your local plumbing code the same as any other vent penetration, and in many jurisdictions needs a permit. Call a licensed plumber for the vent correction itself, even if you’re comfortable diagnosing which cause you have.
FAQ
Is it safe to keep using a leaking macerating toilet while I figure out which cause it is?
For a day or two of careful testing, yes, as long as the leak is a slow weep rather than active spraying and you’re mopping it up between flushes — just don’t leave it running unattended, and keep the area around the unit dry so you can actually see where new water appears. If it’s spraying rather than weeping, or if water is anywhere near the power cord or outlet, unplug it and stop using it until you’ve found the cause.
Will bleach or a stronger cleaner fix or prevent the leak?
No, and for the rubber-outlet cause specifically, it’s more likely to make things worse. Chlorine-based cleaners and continuous rim-hung gels are the products most associated with degrading the rubber discharge seal over time; switching to an ordinary cleaner that’s flushed through rather than left in continuous contact is the preventive step, not a stronger one.
Does a leaking macerating toilet always mean the whole unit needs replacing?
No. Of the five causes above, three are parts you can replace individually — a clamp, a check valve, or an outlet fitting — and one isn’t inside the macerator at all. Replacement only makes sense when several of those are failing at once on an older unit, which is covered above.