On this page
Last Updated on October 25, 2026 by Muhammad Toqeer
Water under a condensate pump does not prove that its tank is cracked. It can overflow from an inlet, escape from the discharge connection or run down from the appliance above. Stop the equipment producing condensate, isolate power safely, and locate the first wet point before deciding which part needs replacing.
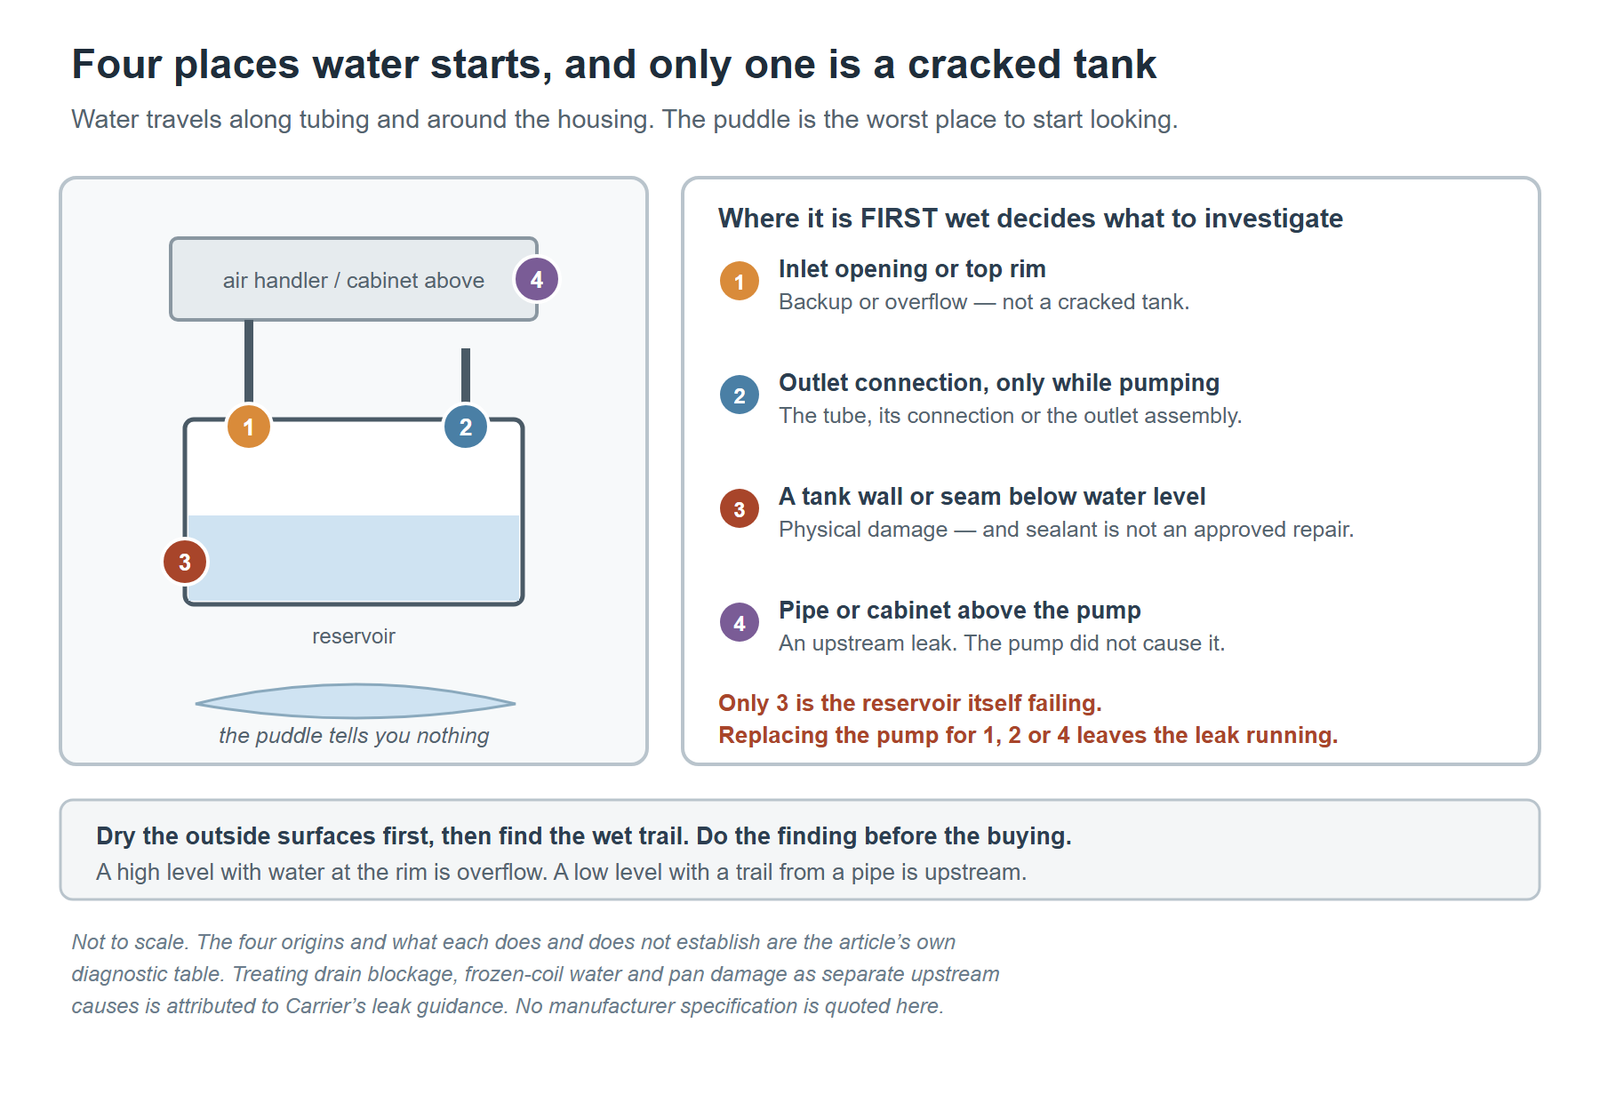
Where does the water first appear?
Look above the puddle. Water can travel along tubing and around the housing before reaching the floor, making the lowest wet surface a poor guide to the original leak.
One-minute check: with the equipment off and electrical parts safely isolated, dry the accessible outside surfaces. Look for a wet trail from an inlet pipe, outlet connection or tank wall. Do not touch a wet plug or step into water to reach a disconnect; shut down from a safe dry location instead.
| First wet location | What to investigate | What it does not establish |
|---|---|---|
| Inlet opening or top rim | Backup, overflow or an inlet missing its opening | A cracked tank |
| Outlet connection during pumping | Tube, connection or outlet assembly | A failed reservoir |
| A particular tank wall or seam below water level | Physical damage or a tank defect | That sealant is an approved repair |
| Pipe or cabinet above the pump | An upstream leak | That the pump caused it |
The purpose is to identify the failed boundary. Changing the whole pump before doing that can leave the original leak untouched.
Is the tank leaking, or is it overflowing?
Overflow means the water reaches an opening because it is not leaving fast enough or the pump did not start. A tank leak means water escapes through a surface that should contain it.
One-minute check: note the reservoir level and the highest wet point before draining it. A high level with water at the rim belongs on the overflow branch. A low level with a trail down from a pipe belongs on the upstream branch until proved otherwise.
Do not intentionally fill an installed pump to the brim to test this. Residual water can continue arriving after the equipment is turned off, and a controlled test requires room to contain it.
A technician can test a disconnected serviceable reservoir as the manufacturer permits, with the motor assembly protected and the water contained. That separates a physical tank defect from an operating overflow without risking the floor as a test tray.
Why might it leak only while pumping?
That timing makes the outlet path worth inspecting first. A marginal tubing connection may stay dry between cycles and leak when discharge begins.
One-minute check: from a dry position during an otherwise safe, fully assembled test, watch the outside of the outlet connection. Do not hold it, tighten it or remove the tube while the pump runs. Shut down before any adjustment.
The DiversiTech CP-22 documentation describes a serviceable outlet/check-valve assembly and a specified tubing connection.[1] That does not make every clear tube or similar-looking fitting compatible. Check the exact size convention and the installed assembly’s instructions before replacing either part.
Avoid tightening a plastic connection until it “feels safe.” Support the tubing so it does not impose side load, and use the installation method specified for that fitting. A damaged outlet body cannot be repaired by squeezing the hose harder.
If the confirmed fault is the tube or its connection, replacement belongs at that boundary:
Can water from the air handler imitate a pump leak?
Yes. A damaged upstream pan or melting ice at the evaporator can leave water near a functioning pump. [Carrier’s leak guidance][2] treats drain blockage, frozen-coil water and pan damage as separate causes.
One-minute check: look for a trail on the outside of the incoming drain or cabinet. Record whether water arrives inside the pump inlet or runs down its outside. Leave cabinet access and frozen-coil diagnosis to an HVAC technician.
If the pipe does reach the tank, confirm it is positioned according to the pump’s manual. An inlet arrangement must let water enter without interfering with the internal mechanism. Do not trim or move appliance drains without checking their requirements.
If the reservoir itself is confirmed damaged, compare replacement condensate pumps by the drain route and the overflow protection rather than by tank size alone.
Can you patch the reservoir?
Use a manufacturer-approved tank replacement or repair method if one exists. Do not assume an adhesive is compatible with the tank material, condensate chemistry and operating conditions. A patch that looks dry today is not a tested overflow-protection system.
Ask for the exact tank service-part number. If none is offered, compare complete replacement with a properly documented repair rather than improvising from another model’s reservoir.
The discharge-routing article and drain-slope article address route defects that a tank replacement cannot fix.
When this needs a pro
Use professional service when water reaches electrical equipment, the reservoir cannot be removed under the documented maintenance procedure, the leak comes from inside the air handler or the system repeatedly overflows after cleaning. After repair, have normal drainage and overflow shutdown verified separately. A dry connection during one pumping cycle proves only that particular observation.
[1]: https://cdn.bakerdist.com/diversitech_cp-22_article_1375441859437_en_ii.pdf [2]: https://www.carrier.com/us/en/residential/hvac-resources/air-conditioners/why-is-my-ac-leaking-water/