On this page
Last Updated on October 17, 2026 by umar bwn
Most pages that mention a pitless adapter treat it as the default suspect the moment the ground near the casing looks wet. It usually isn’t. A threaded joint higher up the galvanized drop pipe, or poly line rubbing against the inside of the casing, loses water more often than the adapter’s own seals do. Before you dig anything up, there’s a one-minute test that tells you whether you’re even looking at a real leak, and an overnight test that tells you where.
Two things get mistaken for this, and neither is a leak
Two faults produce almost the same symptom — pressure won’t hold, something seems wrong at the wellhead — without a drop of water actually reaching the ground.
The pump is losing prime, not water
If the pressure drops overnight but nobody has noticed standing water anywhere, you may not have a leak at all. A worn foot valve or check valve lets the water column drain back down the casing between pump cycles. The pump re-primes in the morning, runs fine all day, and loses pressure again by the next morning — but the water hasn’t gone anywhere. It’s redistributed inside the casing, not lost to the soil.
One-minute test: run a few fixtures, let the tank cycle to cut-out, then do nothing for several hours. If pressure drops to zero with no wet ground anywhere near the casing, that’s prime loss, not a leak — see well pump runs but no water comes out for the fix, which is a foot valve, not an adapter.
Something else nearby is bleeding pressure
A case on the hearth.com forums looked identical to an adapter leak: pressure fell from 50 psi to zero overnight and the pump was short-cycling. Days of digging around the wellhead turned up nothing. The actual fault was a misadjusted frost-free hydrant a few hundred feet away, weeping roughly 6 psi an hour — about 200 gallons a day — through a fixture that had nothing to do with the casing.
One-minute test: before you touch the wellhead, walk the property and check every hose bib, hydrant, and irrigation valve on the system. Shut each one fully, then recheck the tank gauge an hour later. If the drop stops, you found it, and it wasn’t underground at all.
The decisive test: kill the breaker, then watch two things at once
If neither of those explains it, confirm you actually have a ground leak before guessing which part caused it. Prime the system to a normal cut-out pressure, shut the breaker to the pump, and leave it alone — ideally overnight, with no fixtures run.
Then check two things together, not just the gauge:
- The tank pressure. A real leak drops it steadily with the pump off,
because water is physically leaving the system.
- The ground around the casing. A soggy or sunken patch that wasn’t there
before, especially right against the casing wall, confirms the water is going into the soil and not back down the pipe.
Pressure dropping with dry ground nearby points back to the foot valve above. Pressure dropping with a wet patch confirms a real underground leak — and only then does it make sense to start ranking causes. If pressure is also low while the pump is running, not just dropping after it stops, work through low water pressure on a well first — a leak is only one of eight things on that list.
If it’s a real leak, these are the likely locations — in order
A threaded joint on the drop pipe
Several well-forum threads on this exact symptom put this ahead of the adapter itself as the more common culprit. Galvanized or black pipe sections are joined with threaded couplings at intervals down the casing, and any one of them can loosen, corrode through, or have had the thread sealant fail at installation. It’s also the thing experienced techs rule in or out first, before ever touching the pitless unit, because it’s cheap to suspect — no part needs ordering to confirm it.
One-minute test: it’s not something you confirm without pulling the pump, but it’s the first thing a well contractor should check, not the last. If you’re paying for a pull anyway (next section), ask that every threaded joint gets inspected on the way up, not just the adapter.
Poly pipe chafing against the casing wall
On wells using flexible polyethylene drop pipe instead of rigid pipe, the tubing can rub against the inside of the steel casing every time the pump cycles and the pipe flexes slightly. Over years, that abrasion wears a thin spot and then a pinhole. It’s a slow leak at first — small enough that it shows as a gradual pressure drop before it shows as wet ground.
One-minute test: same as above — this one only confirms visually once the pipe is out. The tell beforehand is a leak that got worse gradually over months rather than appearing suddenly.
The pitless adapter’s seals — and there are two of them, not one
This is the one everyone assumes first, and it does fail, just less often than the two above. On a slide-type adapter like Boshart’s P-100 and P-100NL, there are two separate seals doing two separate jobs:
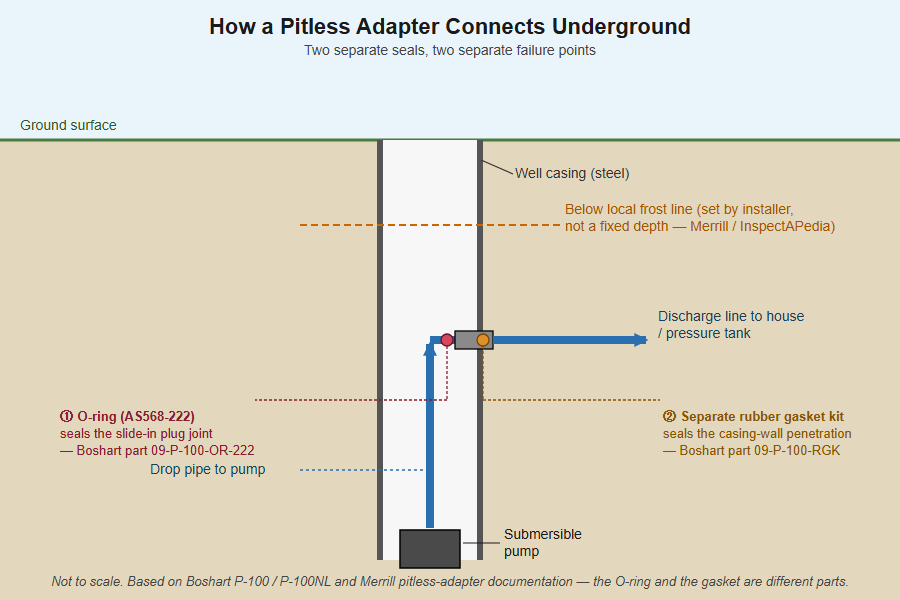
- An O-ring (AS568 standard size 222, Boshart part 09-P-100-OR-222) seals
the slide-in plug where the drop pipe’s fitting inserts into the adapter body.
- A separate rubber gasket kit (part 09-P-100-RGK) seals the joint where
the adapter body itself passes through the casing wall.
Those are two different failure points with two different parts. “The seal failed” isn’t a complete diagnosis until you know which one — and Boshart’s own documentation specifically warns that P-100/P-100NL parts aren’t interchangeable with its PA-100/PA-100NL line, so the adapter’s exact model matters before you order either kit.
One-minute test: again, this is a pull-and-look confirmation, not something you check from the surface. What you can rule in beforehand: if the leak is small and started recently with no gradual pressure-drop history, an O-ring is more consistent with that pattern than a corroded pipe joint, which usually worsens over months.
Galvanic corrosion eating the fittings
A documented and specific failure mode, not generic “corrosion happens”: ordinary brass fittings paired with the silicon-brass components in some adapter assemblies, set against an iron casing, corrode preferentially at the brass — brass sits lower than silicon brass on the galvanic series, so it’s the brass that gets eaten first. This shows up as pitting or a thinned wall at the fitting, often years before anything else on the system looks worn. Wells with aggressive or mineral-heavy water are more exposed to this, and it’s part of why Merrill Manufacturing offers a stainless-steel alternative for corrosive water, alongside its standard no-lead brass.
One-minute test: none from the surface — this is diagnosed on inspection. Flag it as a possibility if your water is known to be hard, acidic, or high in iron, since that’s the environment this failure needs.
A cracked or rust-perforated casing
Rare, and worth naming because it produces the identical symptom — pressure won’t hold, wet or sunken ground near the casing — for a completely different reason. An older steel casing that’s rusted through, or one damaged during installation or by ground settling, lets soil and groundwater move in and out around the casing itself rather than through the adapter. This is a bigger and more expensive repair than a seal kit, and it’s the reason the overnight test above matters: it narrows “something near the wellhead is wrong” down before anyone starts assuming a cheap fix.
One-minute test: none without pulling the casing inspection, but a wet patch that tracks the full circumference of the casing rather than one side is more consistent with a casing fault than with a single fitting leak.
When this needs a pro
Anything past the overnight test is well-contractor territory, not a weekend fix. Confirming which joint or seal failed means pulling the drop pipe and the pump, and on a submersible system that means disconnecting mains-voltage wiring at the wellhead first — not a job to start without shutting power at the breaker and verifying it’s off with a meter, not just the switch. On a casing smaller than 5 inches, pulling the pump and inspecting the buried half of the adapter usually means excavating at the wellhead too, which is why most homeowners call this in rather than renting a pipe puller.
If the contractor is already pulling the pump to replace an adapter seal or a corroded fitting, that’s also the sensible moment to find out how many years are actually left in the pump itself — the labor to pull it is most of the cost either way. Our guide to the best deep-well submersible pumps covers verified GPM, head, and warranty figures if the tech tells you the motor’s windings or bearings are the next thing to go.
A basic repair kit, if your contractor confirms the model, is something like the Boshart P-100 O-ring and gasket kit — buy the part number the contractor specifies, not a generic match, since P-100 and PA-100 parts are not interchangeable.
FAQ
Do I need to dig up the well casing to check the adapter?
No — not as a first step. The overnight breaker-off test tells you whether you have a real leak at all, and the ground check tells you whether it’s localized at the casing. Both are done without digging anything.
How deep is a pitless adapter supposed to be?
Deep enough to sit below your area’s frost line — that’s the entire design purpose of the part, letting the water line exit the casing underground instead of through an above-ground pit that could freeze. There’s no single national number; it depends on local frost depth, which is why a well contractor sets it rather than a fixed spec sheet figure.
Can a pitless adapter leak without the pressure dropping fast?
Yes. A small O-ring or gasket leak, or early-stage galvanic corrosion, can show up first as ground that stays slightly damp longer than it should after rain, with pressure only dropping noticeably months later. A sudden, sharp pressure drop points more toward a pipe joint failing outright or a cracked fitting than a slow seal seep.
Is a wet spot near the well casing always a leak?
No. Surface water pooling after rain, poor grading, or a nearby sprinkler head can all produce a damp patch near a wellhead with nothing wrong underground at all. The combination that actually confirms an underground leak is pressure dropping with the pump off and ground wetness that tracks with it over several dry days.